Introduction
In this tutorial we are going to be adding a menu item to a binary.
There are many uses for adding a menu item to an existing binary.
Perhaps you find yourself typing the same phrase over and over – it may
be a lot easier just to make it a menu item that when selected, pasted
that phrase into your app. Maybe you would like to add a little sunshine
to a co-workers day by adding a “UNDO” menu item, that instead deletes
the file, reminding him or her of the importance of not taking the undo
button for granted. There are many reasons for adding a menu item, but
most of all, it’s just interesting how it works ![]()
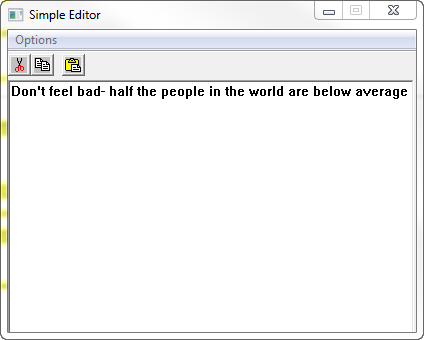
Our target will be a simple app I made for my regular reverse engineering tutorials called Simple Editor. It doesn’t do much, but it helps showing how this is done on a simple app so you don’t get bogged down in superfluous code. Go ahead and run the app:
You can see that there’s not much to it (and I’m pretty sure the
toolbar buttons are wrong, but it doesn’t matter for this tutorial.
Trust me, I’ll fix it before the ‘Adding Toolbar Buttons tutorial ![]() )The Simple Editor basically allows you to do three things. One is to repeat what you typed in a message box:
)The Simple Editor basically allows you to do three things. One is to repeat what you typed in a message box:
The other two things are clear the text window and exit:
So what we are going to do is add a menu item to this app called “Shout Out!!!” that will insert a helpful message into the text area.
Adding The Resource
First, load the Simple Editor into Resource Hacker (Resource Hacker can be downloaded from my tools
page) and you will see the three resources it has found in our program:Resource Hacker has found a Bitmap (the toolbar), the menu, and a dialog box, which is our main app’s window. Go ahead and open the menu folder, open the “Mymenu” folder and click on the 1033 with the pretty flower next to it:
As you can see, this opens the various characteristics of the menu in our app as well as a sample window showing the menu below. If you click on the options menu in the example window, it will show you what it will look like:
Now, move up to the main window and look at the menu data. Here you can see that the name of the menu is Mymenu, the menu is in English (duh), and the information about this specific menu items. First is the POPUP “Options” telling us that this is the title of the menu and will pop-up additional items. Next are three menu items, each corresponding to the three item that are currently in our menu. What we are going to do is very simple: we are going to add (copy and paste is fine) a line with our own menu item in it. This line must contain all of the same data as the other item except it should have it’s own name and a unique code:
In this case, I have added an item called “SHOUT OUT!!!”. I can see that the codes 32000, 32001, and 32002 have been taken so I will pick 32003. These will be VERY important later, so make sure you at least notice them. At the end of the line are some attributes telling the app we want to see it as text blah blah blah. Now, click on the “Compile Script” button at the top:
And now if you go to the example window and click on the Options menu, you will see our new menu item!
We have altered this binary so we must save it with this new resource in it, so select File -> Save (or Save As if you’re not the daring type). I saved it as SimpleEditor2, but then again, I’m not the daring type:
Now don’t go and think “I’ve done it! I a l33t h4k0r now!!!”. All you’ve done is added a menu resource to the binary. The binary has no idea what to actually do with it, and will show you this as soon as you run it and choose our menu item:
I’ll break the suspense; it does nothing. That is because when this program was written, the author never took into consideration a SHOUT OUT!!! button so never told the program what to do if a user selected it. Now begins the hard part: we must tell the program what we want to do.
Finding The Menu Compare Instructions
Fortunately, we are dealing with a fairly small app, and fortunately the ID’s that were used for the menu resources were quite unique (thank me later). Most of the time, the app will be far larger and the IDs will be 0, 1, 2 etc. The reason we are glad that these IDs are unique is that we can search directly for them and not hit too many false positives (actually, in our case, none). So remember back to those IDs that were in the menu section and you will remember that the first one was 32000. Let’s search the binary for this constant as we know somewhere the app will need to compare something against this ID to see if that was the menu option selected (and not say, the exit menu item). Open the app in OllyDBG (you can get this on my tools
page as well), Right click in the assembly window and select “Search for” -> Constant:Now, this 32000 is in decimal, so I put it into the Signed (or Unsigned) decimal edit box, make sure “Entire block” is selected and choose OK:
Fortunately, Olly has taken us directly to the section of code we are looking for:
Notice the compare AX, 7D00? 7D00 is hex for 32000. Every Windows program will have something that resembles this grouping of code. Well, every Windows program that has a menu (and many that don’t). Sometimes it will not be easy to find, especially if the program was coded in something other than C/C++, but the more you do this the more you will grow to recognize this section.
A second option is to simply run the app, select a menu item that you can figure out an API call for, put a BP on every call to that API, and eventually you will find your way to this area.
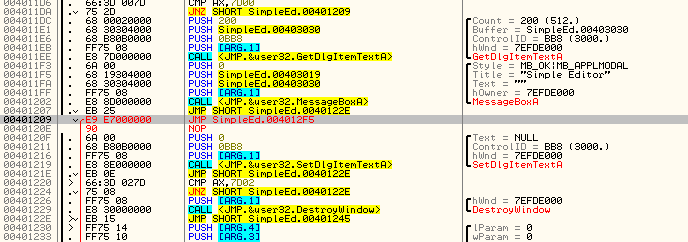
This area I’m referring to is the section of code that checks which menu item was selected. If you look above where Olly has stopped, you will see that if in fact AX is equal to 32000, it will fall through to a GetDlgTextItem and a MessageBox. This should signal to you that this is the “Show text” menu option, as it grabs the text that has been types and shows it in a message box. You could also just remember that the code 32000 corresponded to the “Show text” menu item resource in Resource Hacker. If you look a little past that you will see that AX is then compared with 7D01 (32001), and if it’s equal we call the SetDlgItemTextA (clearing the screen), and if it’s not we compare AX with 32002 (7D02) which will then call the DestroyWindow API:
It’s pretty easy to tell from this picture that there are three menu items and three sections of code corresponding to each of them. That seems pretty perfect, seeing as our app originally contained three menu items, but what if we want four? Well, that’s where the code cave comes in.
Finding The Code Cave
The problem is we can’t just go adding another compare and API call for our new menu item in the middle of all this code. I mean, this code does shit- you can’t just write over it! So what we are going to have to do is call our own code from somewhere in this section of code, and our code needs to check our own menu item ID (32003) to see if it was selected. The problem is compounded by the fact that when we put a jump to our custom code, we will have to overwrite some instructions to make the jump, so those instructions that were overwritten will need to be moved to our cave as well. If you are a little hazy on code caves, please see my tutorial “Adding a Dialog Box” which goes over the basics of them.
Well, the first thing we need to do is find some space to put our code. Normally I would use the Find Code Cave script used in the previously mentioned tutorial, but since this app is so small, you only need to scroll down about a page (right past the jump table) and you’ll hit a bunch of empty memory:
So our code cave will start at address 4012F5 (This skips one byte of zero, but I like to have a little buffer anyway ![]() ) Now we need to scroll up and find out where we can make the jump to
our code cave, a place where it will be easy to fix what we overwrite.
Since the first check (for ‘Show Text’) is longer than the others, I’m
gonna leave that one. That leaves either the second (for ‘Clear Text’)
or the third (for ‘Exit’). It really doesn’t matter which of the two you
pick, but I picked the second. As we saw earlier, this second section
of code starts at address 401209 with the initial compare to AX, and
ends at address 40121E, with a jump out of this section after the call
to SetDlgItemTextA:
) Now we need to scroll up and find out where we can make the jump to
our code cave, a place where it will be easy to fix what we overwrite.
Since the first check (for ‘Show Text’) is longer than the others, I’m
gonna leave that one. That leaves either the second (for ‘Clear Text’)
or the third (for ‘Exit’). It really doesn’t matter which of the two you
pick, but I picked the second. As we saw earlier, this second section
of code starts at address 401209 with the initial compare to AX, and
ends at address 40121E, with a jump out of this section after the call
to SetDlgItemTextA:
Now what I’m going to do is copy this entire section of code and put it at the beginning of our code cave. I am taking the whole thing because it is not very big and that way I don’t need to worry about saving registers and stack state. This section of code will be completely contained in our code cave, along with our additional code. So highlight EXACTLY the lines I have highlighted in the previous picture, right click on it and choose “Binary” -> “Binary copy”:
Now scroll down to our code cave, start highlighting the line at address 4012F5 and highlight a large section (enough to fit the copied code):
Now select “Binary” -> “Binary paste”:
Now you will see the copied code in our code cave:
There are a couple points we need to make about this code. The first
is that it conveniently calls the first line of empty code where our
custom code will go if AX does not equal 7D01. This is nice ![]() Only, it will have to be changed
Only, it will have to be changed ![]()
Secondly, you need to know that the call to SetDlgItemTextA that is now at address 401305 is wrong. Notice it is a SHORT call, meaning it doesn’t call a specific address, but an address at a specific OFFSET from this current line. (SHORT calls must call code within FF bytes). So what we need to do is go back up to the original call to SetDlgItemTextA and find the actual address it calls, and then paste that address into this code. Scroll back up to the original call at address 401219 and hit the space bar on it to bring up the assembly window. This shows us the actual address instead of the API name. Copy this address:
and now go back to our code cave and paste this correct address into the call:
Notice the call changes to show a correct call to SetDlgItemTextA.This is why the original JNZ code that we thought was so nice of it to point to the right address is now wrong- we have added bytes. This will need to be fixed (later). We also need to fix the jump at the end as it uses a SHORT jump, and since we’ve moved it, the offset will be different. So go up to the original jump at 40121E, hit the space bar, copy the contents, and then paste them into this last JMP instruction (don’t forget to delete the SHORT word or you’ll get an error:
Now we need to add our own custom handler of our custom menu item. We know that the ID is 7D03 (32003) so we start with a compare AX to this value:
CMP AX, 7D03
We then need to jump to the next check if our ID does not match. To find this address, go back up to the beginning of the third section (the section for “Exit” menu item) and note what the address is of the beginning of it:
We can see that it is at address 401220 (and you can see that the prior section jumps to here from the red arrow ![]() ). So we need to add the next line of our custom code that performs this jump if our menu item was not selected:
). So we need to add the next line of our custom code that performs this jump if our menu item was not selected:
JNZ 401220
OK, now we need to decide what it is we want to do with our menu item. I have decided that every time you choose “SHOUT OUT!!!” it will put in a friendly message into the edit text box. Fortunately, this is very similar to the ‘Clear text’ code used at the beginning of our code cave. Let’s do a quick look at SetDlgItemTextA:
Notice the parameters; handle to window, ID of control, and a pointer to the text to display. If you look at the section we copied, you can see that they sent zero as the ptr to text (meaning none), the ID is 0BB8, and the handle to the window is DWORD PTR SS:[EBP+8]:
So, we are going to do the same thing, but instead of pushing a zero
like the first code section does (to signify no text), we are going to
push an address of the text we want to inject ![]() Now, as we have not entered our text to send yet, when I first
assemble the push with the pointer to the text, I am just going to throw
a guess as to what address it’s going to be, then later, when I know
the exact address, I’ll come back and replace it. This is just so that
Olly reserves enough bytes for the jump. So lets add our next line of
code as PUSH 401328:
Now, as we have not entered our text to send yet, when I first
assemble the push with the pointer to the text, I am just going to throw
a guess as to what address it’s going to be, then later, when I know
the exact address, I’ll come back and replace it. This is just so that
Olly reserves enough bytes for the jump. So lets add our next line of
code as PUSH 401328:
Now, since the second and third argument, as well as the call to SetDlgItemTextA are the same, I will just binary copy them from address range 4012FD-40130A:
Then binary paste by selecting a bunch of lines (including the NOP at the end) and selecting “Binary” -> “Binary paste” at the end of our custom code:
In this new section, let’s first fix the call to SetDlgItemTextA; highlight the call to SetDlgItemTextA above, hit space bar, copy the address, and paste it into the last call of our code ( you will see the call change to SetDlgItemTextA):
*ps. Ignore the ADD BYTE PTR DS:[EAX],AL instructions you see.
This was a mistake I made when making this tutorial and I had to set the
memory back to zeroes- and when you do this, Olly displays them in this
way, instead of the normal DB 00. They both mean the same thing though ![]()
Now, the final instruction is to jump back into the original code after inserting our text. This jump will be the same as the jump at address 40130A, the same place the first section of our code jumps to when it’s done performing it’s functionality. In fact, it’s the same place that all code sections that check for a menu item clicked jump to when they’re done doing whatever they do. So replace the last jump with the address of the jump at address 40130A:
* You can ignore the NOP at the end, or you can modify it to be a zero if you’re a perfectionist ![]()
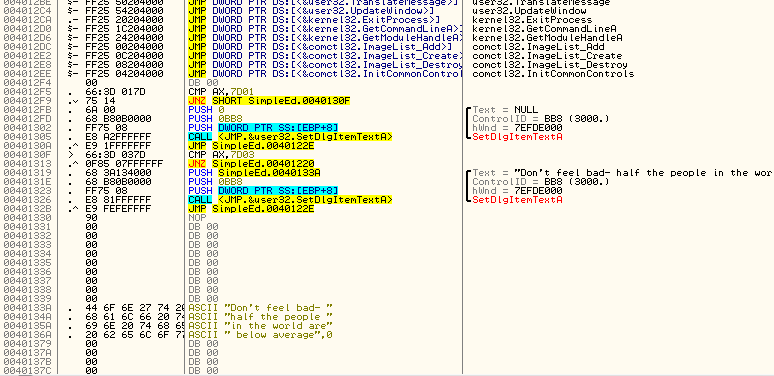
Now we need to put in our message. Just select an address a couple addresses down from your code cave (I like to leave some space in case I made a mistake in the cave- it gives me some room to make changes in). Let’s add our message at 40133A. Highlight that line and choose “Binary” -> “Edit”. Click in the top box (for ASCII), hit delete once to get rid of the zero that’s already in this spot, and type your message. You can type any message you want, but I usually try to make mine helpful, so I put “Don’t feel bad- half the people in the world are below average.” When you click OK, your ASCII data will be saved, but Olly will think it’s code, so he will display it wrong. Don’t worry, it will show up properly soon:):
Now two last loose ends… Don’t forget to change the address of the PUSH for the pointer to our text at address 401319. Remember, this was a temporary address we pushed, so we need to replace our original guess of 401328 with the actual address of the beginning of our ASCII text, 40133A.You’ll know it worked because the text will show up right after the push:
And secondly, the first JNZ instruction at address 4012F9 is pointing to the wrong address (since we added bytes between this instruction and it’s destination). So go to that line and change the JNZ 40130C to JNZ 40130F. We know it’s 40130F because that is the first line of the next section of code, comparing the clicked menu item with the next option:
You will also see that the grey arrow now points to the correct address- the compare at the beginning of our custom code.
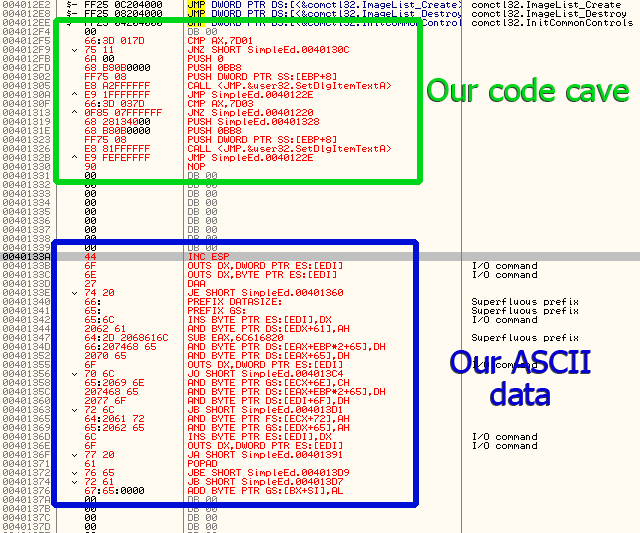
OK, at this point I would save the changes you’ve made, seeing as things get a little dicey if you make a mistake and try to get back to this point (it’s not impossible, it’s just not fun). So highlight the entire section of code, from before your code cave to after your ASCII data, right-click and choose “Copy to executable” -> “Selection”. Then right click on this new window and select “Save file” and save it as “SimpleEditor3.exe”. After you do this, load our new file into Olly and let’s see what he thinks of it. Scroll down to where our code cave is and it should look like this:
That looks a lot better! The first thing you should notice is that
there are now two sections: the first which is the section for the
“Clear text” menu option, and then the second section for the “SHOUT
OUT!!!” menu item, both of which call SetDlgItemTextA. You should also
notice our ASCII text displayed the way it should at the bottom ![]()
You may wonder would would happen if you ran the program right now. Well, nothing would be different than when we originally ran it; all we did was add a bunch of code, but that code is never called! So it’s just loose code in a binary that never does anything.
Soooooo, the last step is
Calling Our Code
If you recall back a ways we chose the second section of the check
menu items selected code and copied this into the beginning of our code
cave:

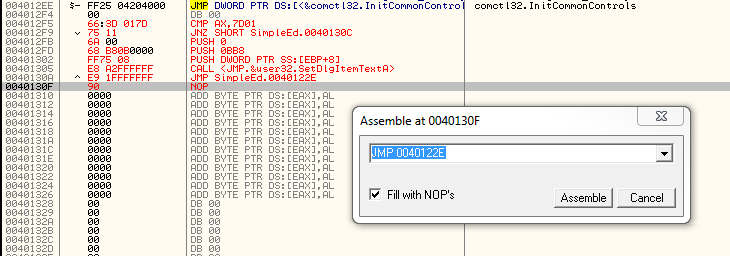
It is now time to make the jump to our code. Since all of this code has been copied to our cave, we do not need to worry about any of it, as long as we don’t go past the final jump at address 40121E. Fortunately, a normal jump is only 5 bytes, so we only need 5 bytes of this section of code. Keep in mind that the beginning of our code cave is at address 4012F5 (if you look in the patched program at the code cave you may think it’s at address 4012F4, but don’t forget the 1 byte equal to zero we put before our cave!!!). Now, highlight the first line of the section of code we copied, hit the space bar, and add a jump to our code:
Now go ahead and run the app. Type in some text…make sure the Show and Clear menu items work. And then hold your head up high, trooper, because today, you are a TOP NOTCH CRACKER!!!!!!
*ps. Don’t forget to save your file as you have added the patch
to jump to our code…and if you’ve run Olly, don’t forget the patch will
be disabled and you will need to open the Patches window and re-enable
it ![]()
-Till next time
R4ndom






June 22nd, 2012 on 7:58 am
Can you add self keygen tutorial(s)?
btw tutorials are great.
June 25th, 2012 on 4:17 pm
I’m working on it
July 31st, 2012 on 3:18 pm
I’m really enjoying the tutorials but this is my favourite so far.
Firstly; if I was having trouble finding a specific item ID in Olly, couldn’t I just change the ID in ResHacker to something unique, find it in Olly, then note down the address and change it back?
Second; if I was just patching a file it would be simple to write a piece of ASM or C code to do the job for me, so rather than distributing a patched .exe (if I were to do such a thing) I could just distribute the patcher. But if we’re changing things in ResHacker, can this be automated in code?
Many thanks for the tutorials,
vy
July 31st, 2012 on 4:53 pm
You would not be able to change the ID in resource hacker and do a search because the original ID of the resource is hard-coded in the binary, Changing the ID in resource hacker will not change the code that references the resource.
Doing this exact thing (looking up the ID in resource hacker) cannot be done automatically, but there are other ways you could automate this process. You would need some interaction, though, from the user
August 1st, 2012 on 12:19 pm
Ah yes, I see the issue now.