In this tutorial we will be talking about code caves as well as PE sections, and touching on the PE header. We will be adding code caves to two crackmes, both available in the download of this tutorial. We will also be using the Multimate Assembler plugin which is also available in the download, as well as LordPE and CFF Explorer which are available on the tools
page. This tutorial, as well as all of my others, can be downloaded on the tutorials page.
Introduction
Code caves are a way of adding our own code to a compiled binary. There are several reasons we may want to add our own code to a binary: we may want to add functionality (just see any of my tutorials on modifying binaries), we may want to change the way a program works by having it run our code instead of (or in addition to) the binary’s own code, or we may wish to make a form of keygenner, as we will in this tutorial.
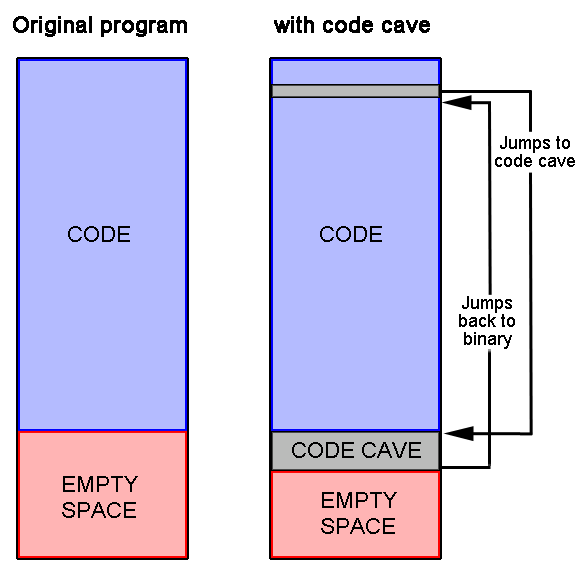
Here’s how it works: First, we find an area in the binary that is not being used. This will be our ‘cave’. We then insert our own code in this empty space, using Olly to assemble the actual instructions. Finally, we add a jump to our code cave somewhere in the original binary so that our code gets executed. At the end of the code cave, we then return execution back to the original binary:
Sometimes the target binary does not have enough free space to fit our added code. In that case, we can add a completely new section to the binary, set it to execute privileges, and then jump to this new section. We will be doing this in the second half of this tutorial.
First, we will use a code cave to make a keygenner of sorts. What I mean is, we are going to add code to display what the serial should be, based on the name entered, as opposed to showing the badboy message. This way, anyone who enters their username will have the crackme automatically tell them what the serial is. BAM! A simple keygenner!
Loading the Target
The crackme we will use for this first part is called crackme.exe. Running the target, we see the main screen appear:
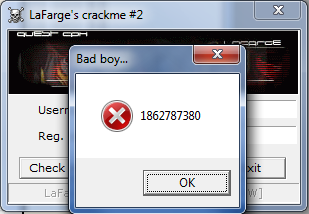
along with music that would probably make Mario jealous. Entering a username and registration code (as I’ve done here) and clikcing the “Check it!” button, we see the badboy:
Pretty straight forward. Now let’s load the target in Olly. First, of course, we see if we can take the easy way out and search for strings, and we see we are not disappointed:
Double-clicking on the badboy brings us to that area of the code:
Clicking on the first line of the badboy code, we can see that patching this app would be very easy:
Of course, we’re not patching this app. What we want to do is change the target so that instead of a badboy, it shows us the proper registration code.
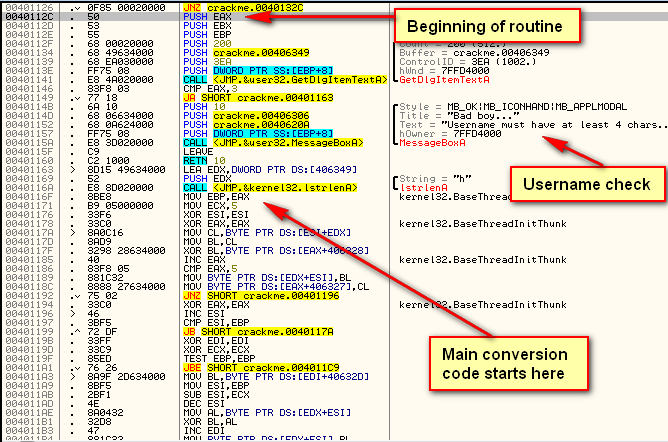
Scrolling up the binary, we see that the main decryption/conversion code starts at address 40112C:
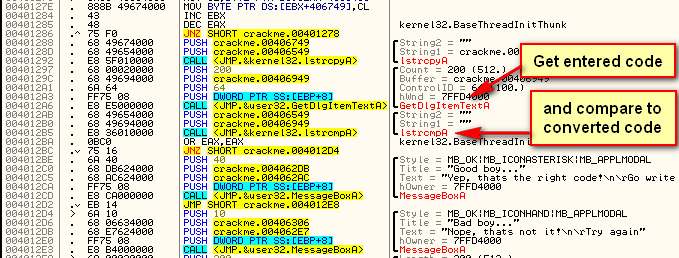
It first get’s our entered username, then checks to make sure it’s at least 4 characters long. After this, the code begins to convert the username into a registration code. At the end of this, the converted registration code will be compared to our entered code to see if they match:
GetDlgItemTextA get’s the entered code and lstrcmpA will compare it to the code that has been converted from our username. If they match, we fall through to the goodboy. If not, we jump to the badboy.
This means, at address 4012AB, the converted serial is pushed on to the stack to be compared with the entered code, pushed at the next address, 4012B0. We know that the entered code is pushed at 4012B0 because we can see that in the GetDlgItemTextA call, 406949 is the buffer where the dialog item was saved, and at address 4012B0, we see that this same buffer was pushed in the call to lstrcmpA. Because of this, we know that 406549, the other address that is pushed in the lstrcmpA function call, is the address for the buffer that the converted code is in.
*** One thing that came up in running this crackme in Olly was access violations and exceptions that the target would not handle. To overcome this, you can either try running the target over again and it usually works, or you can temporarily remove the OllyAdvanced plugin from the plugins folder- we won’t be using that plugin in this tutorial anyway. ***
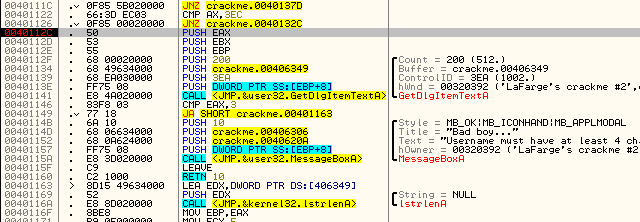
Let’s try stepping through the code to see if we’re right. Set a breakpoint at address 40112C (the beginning of the conversion routine) and run the app. Enter “R4ndom” in the username and anything you want in the reg. code. I entered “12121212″. Now click the “Check it!” button and Olly will break:
Single step until you get to address 401141. This is the instruction where the crackme is going to get our entered username. In the arguments passed to GetDlgItemTextA you can see that one of them is labeled ‘buffer’. This is the buffer that the dialog item that is retrieved will go:
We can see this happen by right-clicking on address 401134 (where the buffer address is pushed) and selecting “Follow in dump”->”Immediate Constant”. This will load the dump window beginning at address 406349, which we can see is filled with zeroes. Now step once over the GetDlgItemTextA call and you will see our username show up in the dump:
So now we know that our username will be kept at address 406349. Let’s let Olly know for future reference. Right-click the first byte in the dump window (address 406349) and choose ‘Label’. Type in “Username buffer” and click OK. Now, anytime this address is used in Olly, we will see our custom label:
Continue stepping and we will first jump over the message that the username must be over 4 characters. We then call lstrlenA. We don’t really need to know this but the encryption algorithm uses this value as part of the encryption process.
We then start stepping over the main encryption algorithm. You will see our username get transformed (several times). You can load the address in the dump if you would like to see them get modified in real time. We don’t really care about this algorithm in this tutorial as we are not going to use it. If we were making a keygen, this part would be our most important code.
Go ahead and step till address 401288 (or place a BP here and run the target). This section is where we compare the converted username against the serial we entered. The first thing the crackme does is to copy the converted string to a new location to compare it. We can see both the correct serial, as well as a new buffer address pushed as arguments to the lstrcpyA function:
We then get the entered serial (with GetDlgItemTextA) and compare the two with lstrcmpA.
Now we can see if we’re right by restarting the target, entering our original username (R4ndom) and entering the correct serial we see in the diassembly for the serial to see if it works:
and clicking “Check it!”:
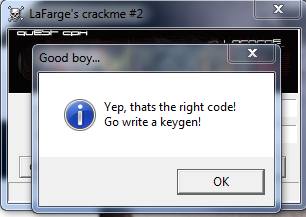
we see we are on the right track.
Now, we want to begin planning our code cave.
Starting the Code Cave
The first thing we have to do is decide where we will call our cave from. We must remember that wherever we put our jump (or call) will overwrite code, so we must either overwrite code we don’t mind losing or we need to copy the instructions we are going to overwrite and paste them at the end of the code cave, thereby running the overwritten instructions right before we return.
Since we aren’t actually going to check the entered serial with the real serial, we could overwrite the lstrcpyA call at address 401288. Another option is the lstrcmpA call at 4012B5. Frankly, we don’t really need anything after the correct serial is computed except the message box that’s going to display it. So let’s go ahead and use the space where the first lstrcpyA is at address 401288:
Next we have to find a suitable place to put our own code into, our ‘code cave’. Because the code section (as well as all other sections) has a minimum size a single block of code can be, unless the last block is exactly filled up with code, the remaining space will be filled with zeroes. If the code goes one byte over this block limit, an entirely new block will be created. The minimum a block of a section can be is stored in the PE header and is called SectionAlignment. This is set by default to 1000h, so if our code takes 1 byte or 1000-1 bytes, it will fit in the block. At one more byte, the operating system will allocate an additional block of 1000h bytes. If this happens, we will have our last block of code contain one byte of code and an additional section of FFFh zeroes. This is where we normally stick our code cave.
Normally, in a small program, we can simply scroll until we find this long series of zeroes and put it there.Other times we are not so lucky. Occasionally, there is not enough space to fit our code into. When this happens, we must create a new section ourselves, something we will do in the second part of this tutorial.
Some may wonder if we could put our cave in another section already in the target, such as .data, .rsrc, or the .rdata sections. Theoretically you could, but the problem arises that these sections are not set up to execute code. Each section in a binary has a certain set of characteristics set up for read-only, write, executable etc. The .code section is usually the only section with the ‘executable’ flag set. We could put our cave in another section, but we would have to manually set this bit to allow code to be executable in it.
Fortunately, in this first part, scrolling down several pages we see we have plenty of room:
So we will put our code cave starting at address 4041B0 (I usually try to put a buffer between the end of code and the beginning of the cave, just in case I need to change something):
Now we need to think about what our code cave is going to do. First, it will load the correct (converted) serial into a register, or rather the address of this serial. It will then push this address onto the stack, along with a couple of additional values that the message box requires. We will then jump back to the original code directly to the call to MessageBoxA. This allows us to use the targets code for calling the MessageBox function. It also allows the target to continue going after the message box is displayed. As far as the target is concerned, it has just shown us the badboy, so after we click OK it will simply continue as if we pressed the OK button on the badboy.
In order to see how we need to set up the variables for our call to MessageBoxA, we can simply look at the target and see how it was done originally:
Here, we can see where the target calls the badboy. First, at address 4012D4, we see the value of 10h pushed on to the stack. Looking to the right where Olly has given us some labels, we see that this is the type of buttons, icons and style that this message box will be, namely a modal dialog with an OK button and an asterisk as the icon.
Next, we push the address for the memory that contains the caption (title) of the box. Here, we can push anything we want, so we’ll just push the same thing they did. If we wanted to be fancy, we could create our own string to display for the caption, but here we’ll just stick with what we’ve got.
Next we push the address of the memory that contains our actual text to be displayed in the box. This is where we’ll push the address of the correct serial. Looking back where we dumped earlier, we see that this address is 406749.
Lastly, we push the handle for the owner’s window. In this case, we’ll just push the handle that was originally pushed.
Finally, we will simply jump to the address of the call to MessageBoxA in the original target’s code at address 4012E3:
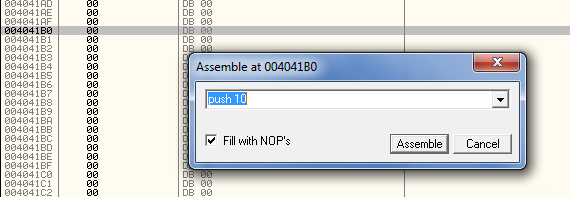
So let’s start coding. First, click once to select the line at address 4041B0. Now hit the space bar (or right-click and select “Assemble”) which brings up our assembler window. Now enter our first instruction, “push 10″:
After doing this and clicking the Assemble button, our new instruction will show up in red and the assemble window will remain open, waiting for our next instruction:
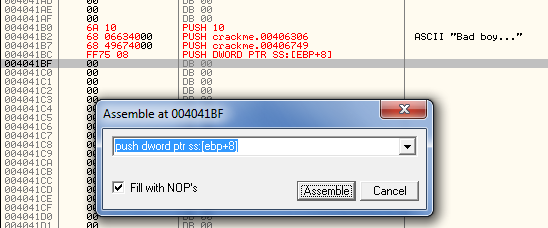
Now, enter our second line of code, “push 406306″. This will push the “Bad boy” caption for our message box. Click Assemble and enter the next line, “Push 406749″. This will push the address of our converted serial. Finally, enter “push dword ptr ss:[ebp+8]“, which pushes the handle to the owner’s window. Normally we must be very careful when jumping to our cave and pushing values from the stack as the stack could easily be changed with the entire process of calling our cave. But in this case, we have not modified the stack, so our value still remains where we expect it. Now, after pressing Assemble, we should see most of our cave done:
The last thing we need to do is call back into our original code in order to display the message box:
Here, we added the jump to 40115A, back to the original code’s call to MessageBoxA.
Now that we have our cave set up, we need to jump to it. Press cancel to close the assemble window, go back to address 401288, select the line and hit the space bar. Enter “jmp 4041B0″. This jumps to our cave:
Let’s try it out. Set a breakpoint at address 401288 (the jump to our cave) and run the app. Enter a username and any serial and click “Check it!”. I entered “R4ndom” (of course). Olly should now break at the line that jumps to the code cave. Step into this jump and we will land at our cave:
You will notice that Olly is displaying the correct serial at address 4041B7, so we know we’re on the right track. Single stepping over the code, you will see the proper arguments pushed on to the stack, and finally, our jump back to the target’s code. Once you step over the call to MessageBoxA, you will see our correct serial in the message box:
We have now created our own keygenner! You should save the entire binary back to the executable to save it so you have it stored on disk. Of course, if we were going to send this out into the wild, we would want to clean it up a bit, adding a real caption and a description of what this box is telling us, but for now, it’s a beautiful thing.
Our Second Code Cave
Now let’s try a little tougher example. Load up Keygenme.exe into Olly and run it:
and clicking the “Check” button:
Well, that seems pretty straight forward, however this time we are going to assume that there is not enough space in the binary to insert a code cave, so we are going to make our own section.
*** In a future tutorial, we will be making this binary into a full-fledged keygen, so stay tuned. ***
Looking at The PE File Sections
This keygenme does not technically require a new section, but I wanted to go over the process, not only to understand how to manually add a section, but also to provide insight into how a PE file is structured. This will help further down the road when working with packers, malware, dll injection and so forth.
Here is an image of the complete keygen file, dumped from a hex editor. You can click on the image if you want to see it bigger:
We can match these sections up with the graph shown in CFF Explorer, under “Section Headers”:
Notice this binary has four sections: .text where our code goes, .rdata for our read-only data (strings and whatnot), .data for our read-write data (global variables) and .rsrc where our resources are stored (buttons, bitmaps, dialogs…). There is also one fifth section, the PE header, shown at the top of the dump. This is not shown as a section, but in the binary, it could be thought of as one.
The start addresses and sizes are shown in the Raw Size and Raw Address columns. This signifies where the data is on disk in its raw form. We can see in the CFF graph that the .text section starts at 0400 in the binary and has a length of 0400. Looking up at the dump, starting at address 0400, we see the .text section begins and ends at address 07FF. This makes the size 0400 bytes.
Each section has a starting address and a size in the ‘raw’ columns, telling us where they reside in the binary. When the Windows loader loads this binary into memory, it copies these sections from disk and places them into memory. The ‘virtual’ columns represents where this data will be copied into memory and how large the space will occupy. We can see in the .text section the beginning address will be 01000 and the size of the copied data will be 030A. This means that when the loader loads this binary from disk, it will load the data beginning at 0400 in the binary into memory beginning at memory address 01000. It will copy 030A bytes from disk, which is smaller than the region allocated in memory, so there will be 0CF6 bytes at the end of this section with zeroes in it (01000 is the size of this memory space, 30A the size of the data. 01000 – 030A = 0CF6).
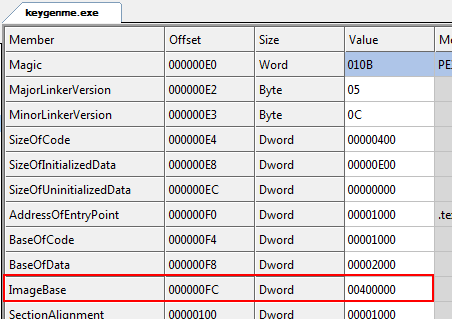
You may say, “Wait a minute, why is the binary always loaded into address 401000 in Olly, and not at address 01000?” The reason has to do with a field in the PE header called ImageBase. Clicking on the “Optional Header” in CFF, we see that the ImageBase is set to 040000:
this tells the loader to load in all sections, but start at address 040000. The Windows loader does not have to load the binary into this address- it is simply where the application would like to be placed. Most of the time, the loader will comply.
*** If you have the randomize base address setting enabled in Visual Studio, the base address will be random, so it will probably not be loaded at address 401000. You can always tell if this has been set in a binary when you load it in Olly and the beginning of the binary is at some weird starting address, such as 0×1143679. ***
The next section, .data, which begins on disk at offset 0800 (and a size of 0200) will be copied into memory beginning at memory address 02000, and 0196 bytes will be copied. Since the next section begins at 03000, this section also has a size in memory of 01000 bytes, so 0804 bytes will be left at the end.
The section at the end of the .text section is where we would normally put our code cave, and in this case it would be fine. The problem arises when the code on disk is almost the same size as the memory space allotted for this code. If the Loader reserves 01000 bytes for the code, and the code takes up 0988 bytes, this would only leave 012 bytes for our cave. Because this would not be enough room, we must add a section to put our cave into.
Manually Adding a New Section
We are going to use CFF Explorer to add our section. Go ahead and load the keygenme into CFF if you haven’t already and click on the “File Header” tab:
We can see that there are clearly four sections in this binary. Clicking on the “Section Headers” we see what we saw earlier, namely the information about each section:
Now right-click in this window and choose “Add Section (Empty Space)” :
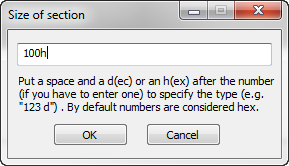
In the space dialog, enter 100h, as we wish our new section to have 100 (256) bytes:
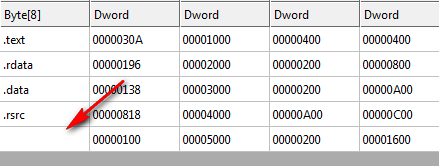
Clicking OK we will see our new section show up:
Let’s rename our section. Double-click in the name field and enter “.r4ndom” and click return:
Also notice that the initial size values have been provided; The virtual size is 0100, the virtual address is 05000, the raw size is 0200 and the raw address is 01600. Let’s take these one at a time:
VirtualSize: This is the amount we placed in the size dialog.
VirtualAddress:
Notice that the default size for a section is 01000 bytes in memory.
This value is set in the “SectionAlignment” field in the PE header.
RawSize: Notice
that the size on disk is 0200, not 0100 which we would expect. This is
because there is a minimum amount of space that a section can take on
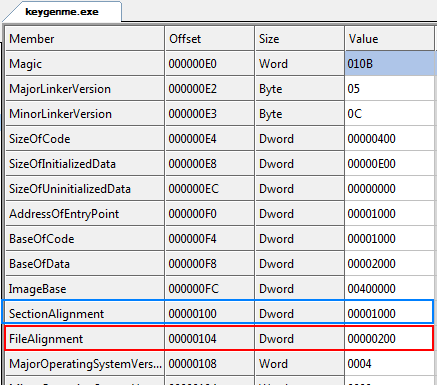
disk. This value is set in the “FileAlignment” field in the PE header.
RawAddress: If you
look back at our hex dump of the binary, you will see that it
originally ended at 015FF. Logically, our new section would start right
after this, at address 01600.
Here we can see the memory and disk alignments.
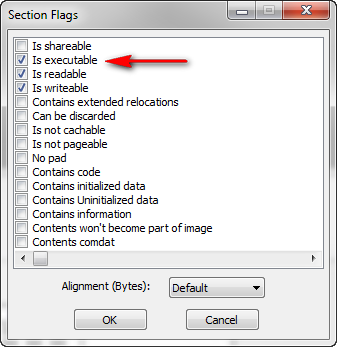
One last setting we need is to make our new section executable, meaning we need to allow code to run in it, as the default for a new section is for it just to be data. Right-click the new section and select “Change Section Flags.” We want to set the “Is Executable” flag:
Now our code cave will be able to run in memory.
Before we can add our section, we must update the size of the binary (as we’ve added 0100 bytes) as well as the header. Right-click the line with our new section on it and select “Rebuild Image Size”. This will add 0200 bytes on to the total size of the binary. Next, right-click and choose “Rebuild PE Header.” This updates our number of sections field, as well as some other fields necessary to load the new section:
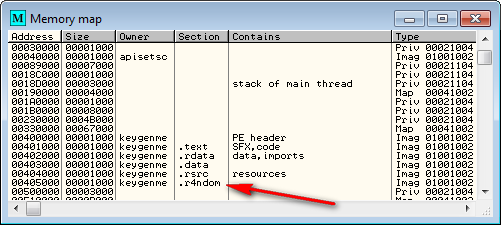
Finally, we must save our changes. Click “File”->”Save As” and choose “keygenme2.exe” for the name. Now load the new file into Olly and bring up the Memory Window:
We can see that Olly recognizes our new section, and we are now ready to investigate where we will call our code cave from…
Investigating the Target
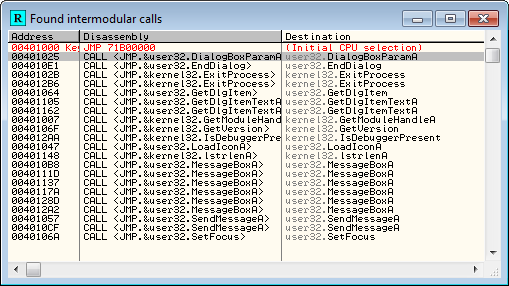
OK. Let’s take a look at our target and figure out where to call our cave. Return to the entry point (ctrl-G and enter 401000) and do a search for intermodular calls:
The GetDlgItemTextA looks as good as any. Click on the first and we see we’re in the general area:
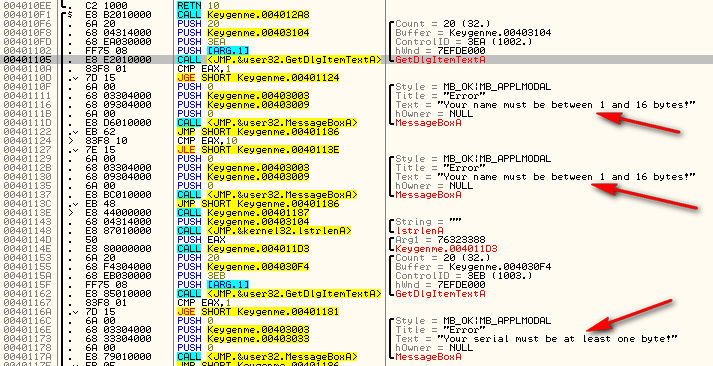
We can see that at first the target get’s our entered user name and stores it at address 403105 (this value is pushed at address 4010F8), then checks it for length. Obviously, it needs to be between 1 and 16 characters. After that, the target checks to make sure we entered at least one character in the serial field:
But you may have noticed there was a quite little call between these two code groups at address 40113E. This is the call to our encryption routine:
Go ahead and place a breakpoint at this address (40113E) and run the target. Enter a Name (R4ndom) and a serial (doesn’t matter) and click “Check” and Olly breaks at our breakpoint. Now, before we continue, let’s load the memory where our name was stored into the dump. Go to address 4010F8, right-click and select “Follow in dump”->”Immediate constant”. Now we see our username in the dump:
Now let’s single step over the call at address 40113E and we will see some strange characters appear in our dump:
We can safely assume that this is the first part of the encryption routine. Single-stepping down a couple lines to address 40114E, we see that there is another call to this encryption section. Stepping over this line, we see the weird characters in the dump turn into the correct serial:
*** You may ask, “Is it always this easy”? No. We got lucky on this one. Though it would not have been very difficult to step through the encryption code to find out where this serial was being stored, which is exactly what I did when first going through this crackme. ***
Now we know (or at least assume) that the correct serial is known by the time we get to address 40115A, and it is stored at location 403114. We can test our theory, though, just to be sure:
and we see we were correct:
Adding the Code Cave
I have set a breakpoint at address 401153 and deleted my others. We know that at this point, memory location 403114 contains our correct serial. So we will place our call here. We are pretty fortunate here in that we also have a message box call right after our jump that we can use to show our serial:
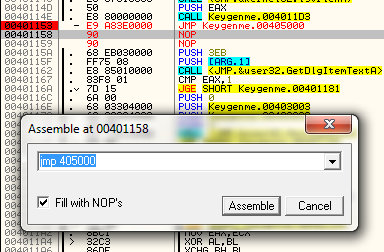
We know our code cave space starts at 405000, as this is the beginning of the section we created, so let’s go ahead and add our jump:
Now let’s create our cave. Make Olly display our new section by going to address 405000:
Now we are going to do the same thing we did in the first part of this tutorial, but we are going to use a new plugin called MUltimate Assembler. Make sure this has been copied into your Olly plugin’s folder, and select “MUltimate Assembler”->”MUltimate Assembler” from the plugins drop-down menu:
*** One note: if you are using the OllyAdvanced plugin, you must turn off the “Kill %s%s bug” option or the assembled code in multi-asm may not work properly. ***
This time, in order to show the ease to which you can assemble with this plugin, we will change the caption and text in our message box. Let’s begin coding. First, MUltimate Assmembler requires that we put in a starting address:
<405000>
I can put anything in here, so I put the beginning of our cave where the initial jump will jump to. Next I start coding the actual cave:
push 10
This pushes the message box style. Then we push our caption. I will define the caption string towards the end, but for now we can push the address:
push @caption
Next we push the text. This is the same deal as the caption:
push @text
Finally, we push the handle. In this case, I’m just going to push NULL, as the message box call doesn’t have to have a handle:
xor eax, eax
push eax
Now we will put our jump back to the original MessageBoxA call:
jmp 40117A
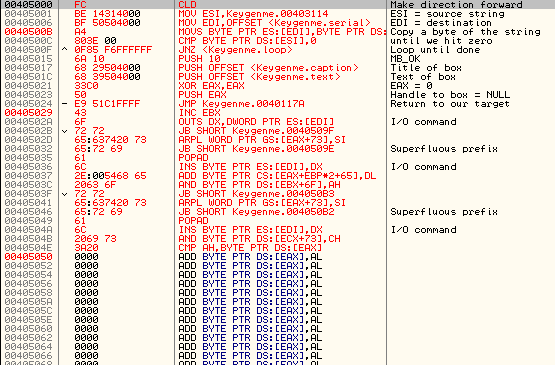
You screen should look like this so far:
Next, let’s add our caption:
@caption:
”Correct serial.\0″
and our message box text:
@text:
“The correct serial is: “
Notice I did not add a zero at the end of this string. this is because we are going to add the text for our serial after it. Message box will start at the beginning of this string and go until it reaches a zero. We are going to manually add the correct serial on to the end of this string and end that with a zero. This way, when message box is displaying the text, it will keep going into the string we add, and will not stop until after the correct serial is displayed as well. So next we must add space to copy in our correct serial:
@serial:
db 00
Here, I have added an empty byte that will be the first character of our serial. since I don’t know the length of the serial, I simply put one byte here, and I will dynamically add the additional bytes of the correct serial, followed by a zero.
*** The maximum number of bytes you can use in MUltimate Assembler after the ‘db’ command is 16. ***
Because this string is at the end of our cave, I can add as many characters as I like to the end, as long as it ends with a zero (and does not go past the end of the section).
Alright, up to this point your cave should look like this (I also added some comments):
*** You may want to save your assembly at this point- right-click the main tab and select “Save to file”. Now, if anything happens, you can just reload it. ***
Before we’re done, we must copy the original serial into our string that will display the text in our message box. To do this, normally we would use lstrcpy, but since we can only use the functions that are available to the target (at least easily), adn this binary does not use that function, we will do it by hand. Insert the following instructions at the beginning of our assembly window:
*** If you have any trouble, I have included the code for this code cave in the download for this tutorial. Just open the MUltimate Assembler plugin and load the file “Keygenme.asm”. ***
Go ahead and click “Assemble”. If there are no errors, you will see the code in your binary assembled at 405000. If there is an error, the error type will be displayed and the line the error at will receive the cursor. If all went well, you should see something like this:
You will notice that Olly cannot figure out that the end of the cave is strings, so he is showing the data as code. Use the AnalyzeThis! plugin (Right-click->AnalyzeThis!) and Olly will get it straight:
Save our new patched file as “keygenme3.exe”. Remember, when selecting “Copy to executable”, choose “All modifications” so that the jump from address 401153 is included, as well as our code cave.
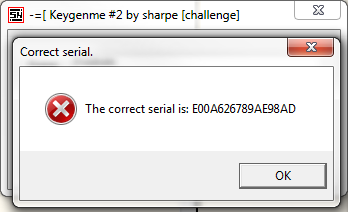
Now, go ahead and run the target. Enter your desired username and click “Check”:
We now have our own keygenme! Well, sort of. In a future tutorial we will be creating an actual keygenme from this crackme, but for now, this works pretty well…
-Till next time
R4ndom




















September 20th, 2012 on 7:12 pm
Wow, fantastic post, thanks for that!
Cheers.
September 20th, 2012 on 9:34 pm
Multimate is awesome to keep useful snippets under the hood, but if you want to do some very serious ASM patching, try Iczelion’s CodeSnippetCreator – it’s just much more powerful!
September 20th, 2012 on 11:59 pm
I agree with you that, when dealing with snippets, CodeSnippetCreater is far and away more feature rich, but in the context of adding code caves to Olly, I will choose MUltimate Assembler every time.
September 24th, 2012 on 7:02 am
Seems that the second file Keygenme2.exe has antidebugging routines and doesn’t work good at my win7.
Good work.
September 27th, 2012 on 9:08 pm
Second code cave (keygenme.exe) quits if it detects a debugger, but it’s easy enough to patch out:
Address 004012B2: JE to JMP
Or NOP the whole thing, etc.
September 28th, 2012 on 8:26 pm
Also, why “xor eax, eax; push eax” instead of “push 0″?
September 28th, 2012 on 10:09 pm
Because I forgot.
October 12th, 2012 on 12:38 pm
great crackme with just one call its possibile to make it keygen itself
July 9th, 2013 on 6:00 pm
the file used this method now always detected as virus by an antivirus, but loader or injector is still safe