This is part 2 of Working with Visual Basic Binaries. In this tutorial we will be using VB Decompiler which is available in the download from part 1 of this tutorial. We will also be using MapConvert and OllyVBHelper- plugins for Olly, P32Dasm and some additional crackmes, all of which are available in the download of this tutorial on the tutorials
page.Investigating CrackmeVB3
Let’s begin by loading the crackme into Olly:
Here, we see our typical call into the VB runtime. You have to admit, it’s pretty amazing (bonehead?) that we can write an entire executable in two lines of code!
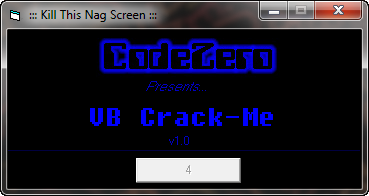
Now, because we don’t know much about this binary, let’s investigate it. Running the target, we see that it has a nag set to a timer of 5 seconds:
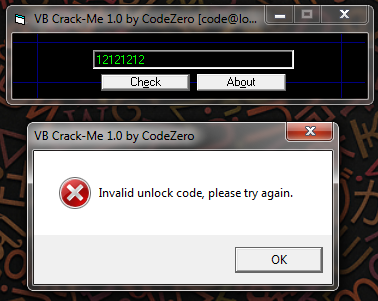
We’ll definitely want to get rid of that! After 5 seconds we see the main serial screen:
and entering a wrong serial, the badboy is displayed:
Let’s take a look at the target’s guts, shall we? This time, instead of VB Decompiler, let’s use P32Dasm.
Using P32Dasm
P32Dasm is a native and P-code decompiler. It is very similar to VB Decompiler, though it does have some added benefits (like exporting MAP files that work).
Loading CrackmeVB3.exe into P32Dasm, we see the main screen, with some data about the target:
You should notice some similarities to VB Decompiler, especially the Form1.Command2.click. This is the callback to a clicking of a button. At the top are ASCII strings used in the target (obviously not obfuscated), and at the bottom we see several timer functions. At the top of the P32Dasm window are some toolbar buttons that you should be familiar with:
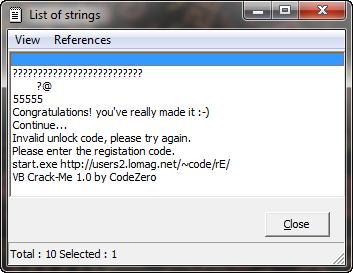
Clicking on “Strings”, we see something similar to the “Search For -> Strings” in Olly:
Though, unlike Olly, double clicking on one does not take you to the disassembly of that section of code.
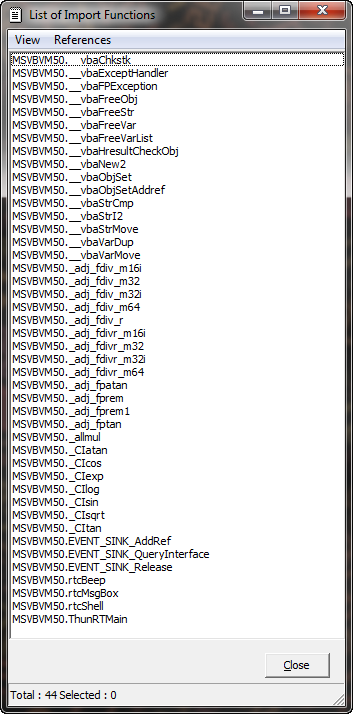
Next is the Constants toolbar button, but clicking on this reveals that there aren’t any. Then we come to ‘Imports’, which is similar to “All intermodular calls” in Olly:
The _vbaStrCmp should stick out like a sore thumb…
Next is the Exports, but this target doesn’t have any, so it’s blank.
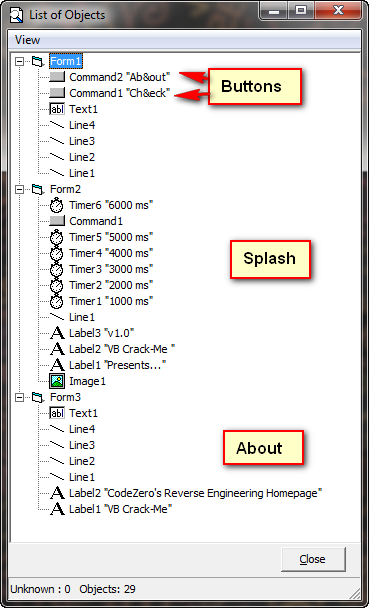
“Objects” should remind you of the VB Decompiler screen:
This shows all of the VB ‘objects’ in the target, such as buttons, labels and timers. We can plainly see that the “Check” button is called “Command1″, and we can assume that this is our main check button callback.
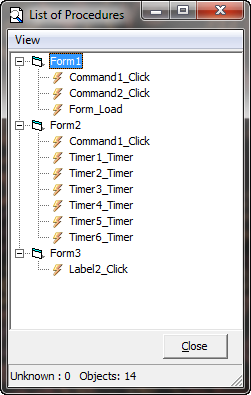
Last up is the “Procedures” window:
This shows us all of the callbacks in the target. We can see that our check button callback is called “Command1_Click”, as Command1 is the callback of our “Check” button.
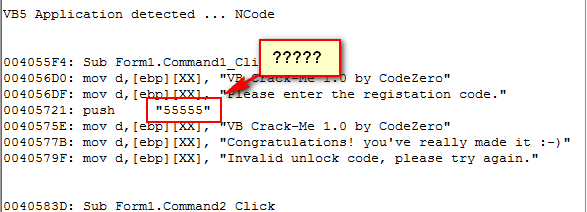
One thing I wanted to point out is that very suspicious series of five’s in the strings section:
It couldn’t really be that simple, could it?
No, please tell me it isn’t:
Oh brother. Oh well, let’s continue to examine this crackme so we can see how using P32Dasm will help us in other ways (like removing that nag). One tool we have is map files…
Making a MAP File
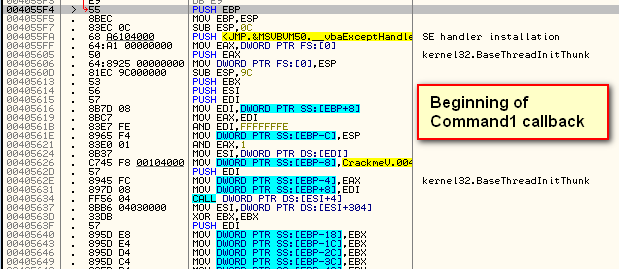
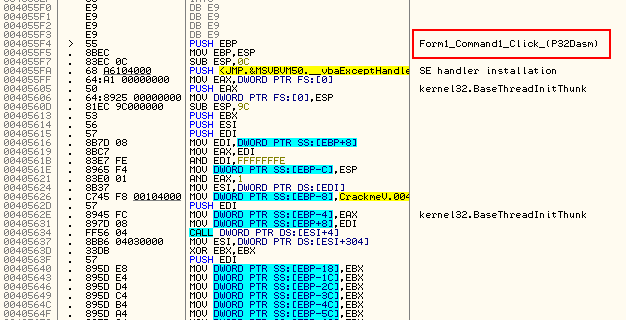
A MAP file is a collection of names for procedure calls that have been compiled into the VB code. Remember, VB uses actual string names to reference callbacks, so we can extrapolate these and import them into Olly. We can do this in VB Decompiler Pro (File -> Save Procedure List) but since the pro version is not free, we can also use P32Dasm. Open the target in P32Dasm again and select “File” -> “Export to MAP file”. Save the MAP file and then load CrackmeVB3.exe in Olly. Let’s take a look at our main suspicious callback before loading the map file. I chose the address of the Command1_Click callback at 4055F4:
Loading the target in Olly and jumping to that address, we see where the Check button callback begins:
We will use the MAP converter plugin for Olly (included in the download) in order to bring in the MAP file we created in P32Dasm. Save the DLL for the MapConv plugin in the plugins directory for Olly and restart Olly (if you haven’t already). Load the target and select “Plugins” -> “MapConv” -> “Replace Comments”:
Select the MAP file we created in P32Dasm. This allows us to put the MAP file info in the comments column. You can also load them into the label column, though I personally find this harder to read. Now, when we look at the callback, we see that the callback information has been added to help us out:
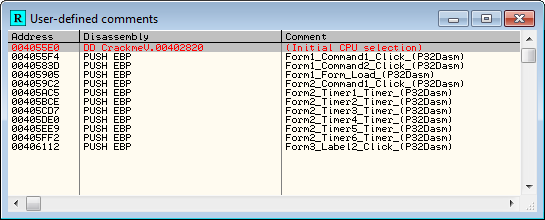
As you can see, we now have a comment for our callback. Now right click and select “Search for” -> “All user-defined comments”:
Now we can see all the names of our callbacks!
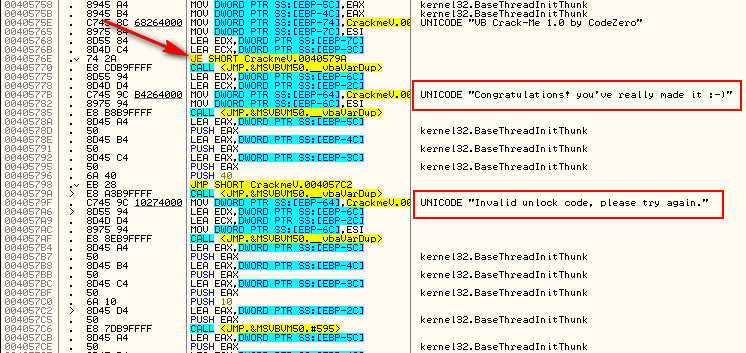
Scrolling down in the Command1_Click callback, we can see the goodboy, badboy, and the obvious patch that needs to be made:
Now all that’s left is…
Removing the Nag
Looking back in P32Dasm, let’s take a look at the timer calls:
From this screen, we can see that Form2 is the nag screen (because it is the one calling the timers).
***You may wonder why we call a timer 6 times; this is because obviously the person who created this crackme did not know how to properly use timers, so they call a one second timer 6 times to mimic a six-second countdown. ***
We can also see from this screen that Form2.Command1_Click is the callback for clicking the OK button after the timer has expired. A very simple solution (though probably not the most elegant) is to simply override the first timer call and make it jump to the callback for the OK button being clicked. This means that when the first callback for the timer is called (meaning we just started the target and we are starting the first one-second timer), we will instead call the code that handles the clicking of the OK button after the timer has expired. This will in effect simply fool the program into calling the ‘close nag screen’ code instead of the ‘start first timer’ code.
Looking at the first timer callback code at address 405AC5:
Let’s just change the beginning to point directly to the code that handles the closing of the nag screen. From P32Dasm, we can see that this callback is at address 4059C2 (the Command1_Click callback code):
Now, let’s patch it:
Now, if you re-start the target, you will see the nag show up for
just a quick second, then disappear. Like I said, not the most elegant,
but this tutorial is not about “elegantly removing nags” ![]()
OllyVBHelper Plugin
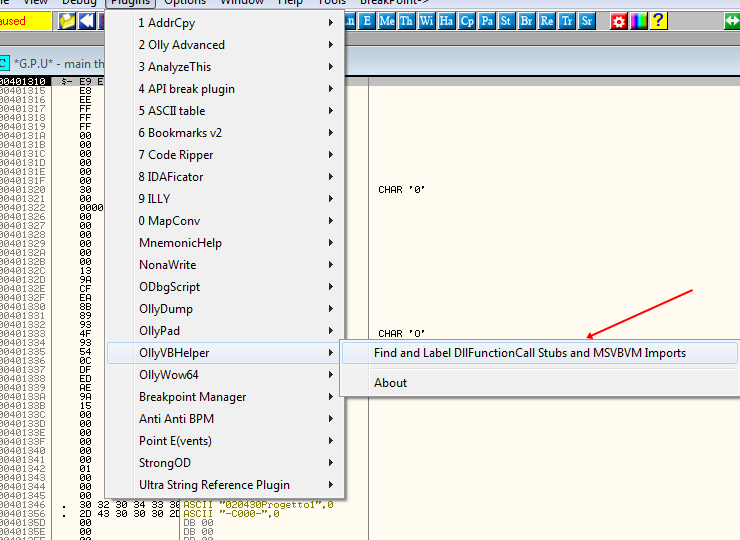
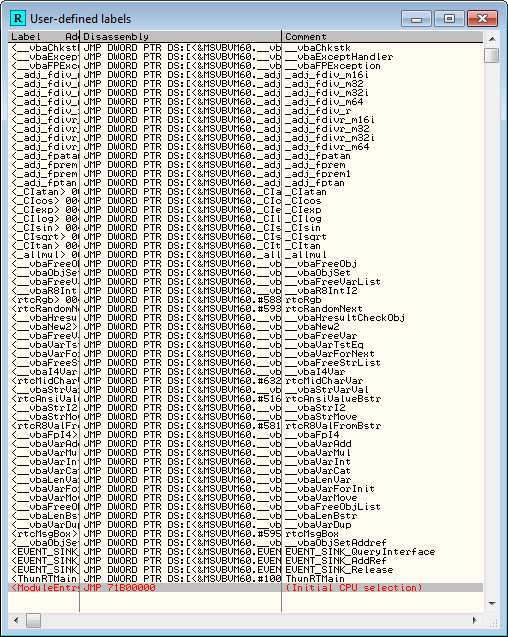
Another helpful tool in the battle with Visual Basic is the OllyVBHelper plugin. The purpose of this plugin is to find and re-label natively compiled VB imports (DLLs). It also finds and renames DLL function call stubs. As an example, I loaded one of the crackmes in Olly (doesn’t matter which one) and chose “Search for” -> “All user labels”. Before running the plugin, his window is empty:
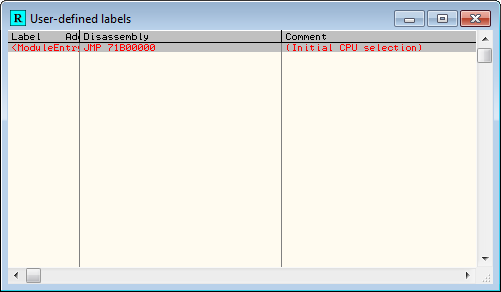
Now, running the plugin:
and we can see that we now have all of our method calls displayed, similar to if we imported a MAP file.
A nice little time-saver.
Using the ‘Point-H’ Technique
Point-H is a technique introduced by Ricardo Narvaja in his cracking tutorials (in Spanish). The ‘H’ stands for Hmemcopy, a very old Windows 95 API call. This call was run directly by the OS for copying ASCII strings, and could be used to find points of interest in cracking. The Point-H is a more modern way of achieving this.
In ntdll32.dll, there is an API that Windows calls when it wants to copy a string. This function is used often, from copying names of imported DLLs, to comparing Windows messages, to API functions like GetDlgItemTextA and SetDlgItemTextA. In the later case, we can use this API to trap when a username or password is initially copied from the window and returned to our program. For example, in our crackme there may be a section that, after clicking the “Sign in” button, our program get’s the entered password from the password field by calling GetDlgItemTextA. When we call this function, kernel32 calls it’s own internal API that copies this value from the window into a temporary variable. Kernel32 then returns this value to our program as a return value of GetDlgItemTextA.
If we know the location of this internal string copying API, we can pause at it, check what string is being copied, and if it is one we’re interested in (like a password) we can then follow execution until it returns back to our target program’s code and we will see where the target receives the password.
The Point-H location will be the same on my computer no matter which target I am running, but will be a different location from another computer’s address, therefore, when we find the address of Point-H on my system, you will have to substitute your own address on your system.
This method is especially useful on targets that are heavily obfuscated, encrypted, or just too hard to find the right code section to start with (like Visual Basic executables). It gives you at least a starting point to begin at…
I have included a crackme with the files of this tutorial called “Point-H Crackme.exe”. It is not a VB target, as we will just use this to find the actual address of this point-h API call.
Finding ‘Point-H’
First, I would suggest doing these steps with a clean install of Olly (just move the ‘plugins’ folder in the Olly install directory temporarily to your desktop) as I have had problems with certain plugins and false breaks in the past. Load the Point-H Crackme into Olly:
*** Make sure you are paused at 401000 and not at the raw entry to the file. If you are not paused at the real OEP (401000) try pressing F9 once- Olly should then pause at the real entry point. If that doesn’t work, just open the ‘Memory’ window (“Me” icon in the toolbar), highlight the Point-H Crackme ‘CODE’ section and hit enter. This will take you to the entry point of the actual binary. ***
Now right click in the diassembly window and select “Search for” -> “Name (label) in current modile”, or hit Ctrl-N. This will bring up the names window:
Toward the bottom will be the TranslateMessage API. Right-click on this and select “Conditional log breakpoint on import”:
This will bring up the conditional breakpoint screen:
Set up the screen as shown. We will use this conditional breakpoint to weed out all of the calls to translate message until we hit the message with the ID of 201. Looking at our old cheat sheet for Windows message IDs (provided in tutorial 16A), we see that this ID corresponds to the left mouse button down message. This is to trap the TranslateMessage function when processing the click of the “OK” button in the crackme.
When you click OK in the conditional breakpoint window, you should see the breakpoint in the ‘Breakpoints’ window:
You may notice that it says “Log” under the Active column, letting us know that this is in fact a log BP.
Go ahead and run the crackme. select “Edit” -> “Register”, and put in a name and serial. Make sure you use TAB to move among the fields or our left mouse click message will fire our breakpoint prematurely. I entered “R4ndom” for the name and “12121212″ for the serial:
Now click OK and Olly should break at our conditional breakpoint:
Now we want to search for our serial in memory. Open the Memory window by clicking the “Me” icon or typing Alt-M. Right-click in this window and choose “Search”:
In the ASCII field, enter 12121212:
Olly should show us where in memory our serial resides:
We want to tell Olly to pause when this memory address is accessed. Highlight the first byte of the serial and right-click on it. select “Breakpoint” -> “Memory, On access”:
Now hit F9 to run the target. Olly will then break on our memory breakpoint (you may break at our previous conditional BP first, in which case just hit F9 again):
This is the Point-H on your system. On mine, as we can see, it’s 774E23BE. Write this down. If you look in the registers window, you will see our serial in ESI:
Let’s now experiment a little with this magical breakpoint. Delete the log breakpoint as well as the memory BPs set earlier. Add a hardware BP on execute on the Point-H address (so it won’t be lost on a re-start) and restart the target. We should then break before we see the main crackme window:
And looking in the registers window, we see that the string we are copying is “OpenProcessToken”:
Hitting F9 repeatedly, you will see various strings in the ESI register, each time ntdll32 calls this internal API. Besides API names, you will see various number sequences flash by as well as other things- basically anything the ntdll32 copies as a string.
Using ‘Point-H’ to Crack the Target
Now, you may be asking yourself, “Great. I did all this work. What’s the point?” (pun intended ![]() ) Let’s try it out. Temporarily disable the BP on the Point-H address
and re-start the target. Select “Register” again from the menu and enter
a name and serial. Before hitting OK, set the BP on Point-H again, then
click OK in the target.
) Let’s try it out. Temporarily disable the BP on the Point-H address
and re-start the target. Select “Register” again from the menu and enter
a name and serial. Before hitting OK, set the BP on Point-H again, then
click OK in the target.
*** If you need to find the address of Point-H to set the BP, open the memory window, click once on ntdll’s .text section (toward the bottom) and click Enter. This will bring up ntdll in the disassembly window. Now you can goto (Ctrl-G) the address of Point-H. ***
Olly breaks at our breakpoint, and looking in the registers window, we can see that this time through is with our username:
Hitting F9 again, we see that we are now at the copying of the serial:
Now for the magic. Open the memory window, right-click on our target’s CODE section and choose “Set break on access”. This way we will break as soon as ntdll32 returns to our target’s code. Hitting F9, Olly pauses in our code section:
As you can see, we paused right after a call to GetDlgItemTextA. Deep inside ntdll32, this function eventually called our code containing the Point-H address. It then returned to our target’s code at address 4012E9. We now have a starting point to try and crack this crackme. The crackme has just gotten the entered serial number, and will soon do something with it. Of course, because this crackme is not very hard, it’s not really that impressive, but in a commercial app, with encryption and protection routines, being able to zero in on this code is a life-saver.
In the case of this specific crackme, continuing to step through the code, and placing access breakpoints on the code section of the crackme, it doesn’t take long before we get to the relevant code for patching (I leave this up to you…).
Another Target Using Point-H
Let’s try another crackme using this technique. Load “CrackmeVB4.exe” into Olly. First, let’s find our Point-H address; open the Memory window, scroll to the bottom, and highlight whatever section your point-h address is in. For me, that would be address 774E23BE in ntdll.dll’s .text section:
Click Enter while this line is highlighted, which opens this module in the disassembler. Now, hit Ctrl-G and enter the address of the point-h on your system to make Olly jump to that location:
and we land at point-h:
Now, keeping this location available in the disassembly window (but without placing a breakpoint yet), and run the target. First, a nag comes up (for what seems like 3 hours), and then we see the main entry screen:
Enter a name and serial, as I’ve done here, and then set your breakpoint (F2) on the point-h in Olly, before clicking OK in the target. After setting the breakpoint, click OK in the target and Olly will break at our point-h:
As we can see in the registers window, this isn’t the stop we want to investigate, so click F9 again. You will need to press F9 a couple more times until a string comes up that we are interested in. In this case, the “You Get Wrong…” string looks pretty promising:
Now what we want to do is trap execution as soon as we get back to our target’s code. Because of the nature of Visual Basic, we can’t just set an access memory breakpoint on the code section of our target (as we would in a native application). So what we want to do is single step (over) until we get back to our target’s code. We will first go into user32.dll (setting the cursor etc) and back through the VB runtime. The badboy will be displayed, after which we will step quite a ways further, but eventually, we will land here:
Here we can clearly see that we are returning after a call to rtcMsgBox which displayed our badboy message window. Above this we see our badboy being created, and more importantly, above that we see our goodboy. Now, finding the patch (at address 408677) is extremely easy. Of course, in this specific crackme, using P32Dasm or VB Decompiler would have been far simpler, but when we run into a devilish VB target where these simple tricks won’t work, the Point-H method can be invaluable.
What About Smartcheck?
This may come as quite a shock to you, but I am not going over Smartcheck. This set of tutorials is meant as a *current* guide to reverse engineering. Because Numega’s Smartcheck is not compatible with operating systems beyond Windows Vista (though it is possible with a lot of work in compatibility modes, running in a virtual machine, installing old VB runtimes etc) I believe it shouldn’t be a part of a current reverser’s toolkit. I have shown how, using tools that work with all versions of Windows like VB Decompiler and P32Dasm, any target can be examined and cracked using just these tools. By all means, if you are using Windows XP and can get Smartcheck to work, it is a valuable tool and should be used. But until someone takes up the charge and makes Smartcheck compatible with newer operating systems, I feel it’s just too old to be relevant.
-Till next time
R4ndom











September 11th, 2012 on 6:14 pm
Have been half through this one, it’s good so far but it introduces new things such as labels and conditional breakpoint which you never talked about them before, and I don’t know; it just feels that there is more to them.
I mean I have no idea how MSG==201 works, like is MSG a keyword in ollydbg which refers to windows msgs?
And what exactly are labels? do they work the same as search for inter-modular functions?
Other than that a great tutorial as usual!
Thanks!
September 11th, 2012 on 7:37 pm
Duly noted. I will try to include some of these topics in future tuts.
September 12th, 2012 on 9:23 am
Thanks for all your hard work man.
September 13th, 2012 on 1:49 pm
hy bro.. i have same program..may be u interest to make crack tuts about this ….
http://www.4shared.com/rar/YWThkZSx/MIG33.html
?i am always waiting for u solution or tuts
GREZZ..
September 19th, 2012 on 7:30 am
hi
is there any tutorial to patch a vb application, which using Harddisk serial/encrypt/decode it, send that code to the application maker, then we receive back the unlock key from them….
please make some tutorial about this
thanks
2 funtions i get from vb decompiler:
Public Function CheckFirstRegister(EG_ID) ’11011610
‘Data Table: 11001E54
Dim var_E2 As Integer
Dim var_12C As Variant
Dim var_14C As Variant
Dim var_16C As Variant
Dim var_18C As Variant
Dim var_1AC As Variant
Dim var_1CC As Variant
Dim var_1EC As Variant
Dim var_20C As Variant
Dim var_22C As Variant
Dim var_24C As Variant
Dim var_26C As Variant
Dim var_28C As Variant
Dim var_2AC As Variant
Dim var_2CC As Variant
Dim var_2EC As Variant
Dim var_30C As Variant
Dim var_32C As Variant
Dim var_34C As Variant
Dim var_364 As Variant
Dim var_374 As String
Dim var_86 As Integer
loc_11011328: On Error Goto loc_110115EE
loc_1101132D: var_E2 = &HFF
loc_11011336: var_FC = ” ============= ALREADY REGISTERED? =============”
loc_1101133C: Call Proc_1_29_1100B834(var_FC, var_E2)
loc_1101134C: var_10C = Chr(&H53)
loc_1101135C: var_11C = Chr(&H6F)
loc_11011364: var_12C = var_10C & var_11C
loc_11011370: var_13C = Chr(&H66)
loc_11011378: var_14C = var_12C & var_13C
loc_11011384: var_15C = Chr(&H74)
loc_1101138C: var_16C = var_14C & var_15C
loc_11011398: var_17C = Chr(&H77)
loc_110113A0: var_18C = var_16C & var_17C
loc_110113AC: var_19C = Chr(&H61)
loc_110113B4: var_1AC = var_18C & var_19C
loc_110113C0: var_1BC = Chr(&H72)
loc_110113C8: var_1CC = var_1AC & var_1BC
loc_110113D4: var_1DC = Chr(&H65)
loc_110113DC: var_1EC = var_1CC & var_1DC
loc_110113E8: var_1FC = Chr(&H5C)
loc_110113F0: var_20C = var_1EC & var_1FC
loc_110113FC: var_21C = Chr(&H4D)
loc_11011404: var_22C = var_20C & var_21C
loc_11011410: var_23C = Chr(&H69)
loc_11011418: var_24C = var_22C & var_23C
loc_11011424: var_25C = Chr(&H63)
loc_1101142C: var_26C = var_24C & var_25C
loc_11011438: var_27C = Chr(&H72)
loc_11011440: var_28C = var_26C & var_27C
loc_1101144C: var_29C = Chr(&H6F)
loc_11011454: var_2AC = var_28C & var_29C
loc_11011460: var_2BC = Chr(&H73)
loc_11011468: var_2CC = var_2AC & var_2BC
loc_11011474: var_2DC = Chr(&H6F)
loc_1101147C: var_2EC = var_2CC & var_2DC
loc_11011488: var_2FC = Chr(&H66)
loc_11011490: var_30C = var_2EC & var_2FC
loc_1101149C: var_31C = Chr(&H74)
loc_110114A4: var_32C = var_30C & var_31C
loc_110114B0: var_33C = Chr(&H5C)
loc_110114B8: var_34C = var_32C & var_33C
loc_110114BD: var_F0 = CStr(var_34C)
loc_1101151B: var_FC = “SOFTWARE\Microsoft\Windows\CurrentVersion\MCP\”
loc_1101152C: Proc_0_0_1100EA9C(var_10C, -2147483646, var_FC)
loc_11011535: var_90 = CStr(var_10C)
loc_1101154C: var_FC = “SOFTWARE\Microsoft\Windows\CurrentVersion\App Management\Exc\”
loc_1101155D: Proc_0_0_1100EA9C(var_10C, -2147483646, var_FC, EG_ID)
loc_11011566: var_94 = CStr(var_10C)
loc_11011572: var_364 = var_90
loc_1101157A: var_10C = Trim(var_364)
loc_11011582: var_374 = vbNullString
If (var_10C = var_374) Then
loc_11011593: var_FC = GetSerialHardDisk()
loc_1101159B: var_D8 = var_FC
loc_110115A1: var_364 = var_D8
loc_110115A9: var_10C = Trim(var_364)
loc_110115B1: var_374 = vbNullString
If (var_10C = var_374) Then
loc_110115C1: var_86 = 0
loc_110115C4: GoTo loc_110115CC
End If
loc_110115C9: var_86 = &HFF
loc_110115CC: ‘ Referenced from: 110115C4
loc_110115CC: GoTo loc_110115D4
End If
loc_110115D1: var_86 = &HFF
loc_110115D4: ‘ Referenced from: 110115CC
loc_110115DA: var_FC = ” ============= REGISTER END =============”
loc_110115E0: Call Proc_1_29_1100B834(var_FC, var_E2, var_86, var_86, var_86)
loc_110115E8: arg_4 = 1
loc_110115EE: ‘ Referenced from: 11011328
loc_110115F0: var_86 = 0
loc_110115F9: var_FC = ” ============= REGISTER ERROR =============”
loc_110115FF: Call Proc_1_29_1100B834(var_FC, var_E2, var_86)
loc_11011607: arg_4 = EG_ID
End Function
Public Function CheckRegister(EG_ID, Pass) ’11014FA4
‘Data Table: 11001E54
Dim var_E6 As Integer
Dim var_150 As Variant
Dim var_180 As Variant
Dim var_130 As Variant
Dim var_170 As Variant
Dim var_190 As Variant
Dim var_1B0 As Variant
Dim var_1D0 As Variant
Dim var_1F0 As Variant
Dim var_210 As Variant
Dim var_230 As Variant
Dim var_250 As Variant
Dim var_270 As Variant
Dim var_290 As Variant
Dim var_2B0 As Variant
Dim var_2D0 As Variant
Dim var_2F0 As Variant
Dim var_310 As Variant
Dim var_330 As Variant
Dim var_350 As Variant
Dim var_110 As Variant
Dim var_368 As Variant
Dim var_390 As Variant
Dim var_378 As String
Dim var_100 As String
Dim var_140 As Variant
Dim var_3C4 As Variant
Dim var_160 As Variant
Dim var_3E4 As String
Dim var_3F4 As Variant
Dim var_1A0 As Variant
Dim var_414 As String
Dim var_1C0 As Integer
Dim var_424 As Variant
Dim var_1E0 As Variant
Dim var_444 As String
Dim var_200 As Integer
Dim var_454 As Variant
Dim var_220 As Variant
Dim var_380 As String
Dim var_E8 As Integer
Dim var_398 As String
Dim var_3A0 As String
Dim var_FA As Integer
Dim var_120 As Variant
Dim var_3D4 As Variant
Dim var_86 As Integer
loc_110145A4: On Error Goto loc_11014F82
loc_110145A9: var_E6 = &HFF
loc_110145B2: var_100 = ” ============= CHECK ALREADY REGISTERED ? =============”
loc_110145B8: Call Proc_1_29_1100B834(var_100, var_E6)
loc_110145C3: var_110 = Now
loc_110145CE: var_120 = Year(var_110)
loc_110145D9: var_130 = Now
loc_110145E4: var_140 = Month(var_130)
loc_110145EC: var_150 = var_120 & var_140
loc_110145F3: var_160 = Now
loc_110145FE: var_170 = Day(var_160)
loc_11014606: var_180 = var_150 & var_170
loc_11014614: var_AC = Proc_4_13_1100BC1C(CStr(var_180))
If (Pass var_AC) Then
loc_11014638: arg_4 = var_E6
End If
loc_11014646: var_110 = Chr(&H53)
loc_11014656: var_120 = Chr(&H6F)
loc_1101465E: var_130 = var_110 & var_120
loc_1101466A: var_140 = Chr(&H66)
loc_11014672: var_150 = var_130 & var_140
loc_1101467E: var_160 = Chr(&H74)
loc_11014686: var_170 = var_150 & var_160
loc_11014692: var_180 = Chr(&H77)
loc_1101469A: var_190 = var_170 & var_180
loc_110146A6: var_1A0 = Chr(&H61)
loc_110146AE: var_1B0 = var_190 & var_1A0
loc_110146BA: var_1C0 = Chr(&H72)
loc_110146C2: var_1D0 = var_1B0 & var_1C0
loc_110146CE: var_1E0 = Chr(&H65)
loc_110146D6: var_1F0 = var_1D0 & var_1E0
loc_110146E2: var_200 = Chr(&H5C)
loc_110146EA: var_210 = var_1F0 & var_200
loc_110146F6: var_220 = Chr(&H4D)
loc_110146FE: var_230 = var_210 & var_220
loc_1101470A: var_240 = Chr(&H69)
loc_11014712: var_250 = var_230 & var_240
loc_1101471E: var_260 = Chr(&H63)
loc_11014726: var_270 = var_250 & var_260
loc_11014732: var_280 = Chr(&H72)
loc_1101473A: var_290 = var_270 & var_280
loc_11014746: var_2A0 = Chr(&H6F)
loc_1101474E: var_2B0 = var_290 & var_2A0
loc_1101475A: var_2C0 = Chr(&H73)
loc_11014762: var_2D0 = var_2B0 & var_2C0
loc_1101476E: var_2E0 = Chr(&H6F)
loc_11014776: var_2F0 = var_2D0 & var_2E0
loc_11014782: var_300 = Chr(&H66)
loc_1101478A: var_310 = var_2F0 & var_300
loc_11014796: var_320 = Chr(&H74)
loc_1101479E: var_330 = var_310 & var_320
loc_110147AA: var_340 = Chr(&H5C)
loc_110147B2: var_350 = var_330 & var_340
loc_110147B7: var_F4 = CStr(var_350)
loc_11014815: var_100 = “SOFTWARE\Microsoft\Windows\CurrentVersion\MCP\”
loc_11014826: Proc_0_0_1100EA9C(var_110, -2147483646, var_100)
loc_1101482F: var_94 = CStr(var_110)
loc_11014846: var_100 = “SOFTWARE\Microsoft\Windows\CurrentVersion\App Management\Exc\”
loc_11014857: Proc_0_0_1100EA9C(var_110, -2147483646, var_100, EG_ID)
loc_11014860: var_98 = CStr(var_110)
loc_1101486C: var_100 = GetSerialHardDisk()
loc_11014874: var_DC = var_100
If (Len(var_DC) > 8) Then
loc_11014884: var_110 = 8
loc_11014891: var_368 = var_DC
loc_11014899: var_120 = Mid$(var_368, 1, var_110)
loc_110148A2: var_DC = CStr(var_120)
loc_110148AC: GoTo loc_110148FA
End If
If (Len(var_DC) = 0) Then
loc_110148BF: var_DC = “12345678″
loc_110148C2: GoTo loc_110148FA
End If
If (Len(var_DC) ”
loc_11014CB0: Call Proc_1_29_1100B834(var_3A0 & var_F0, var_E6)
loc_11014CCA: var_F8 = Proc_2_5_1100C218(var_F0, var_380)
loc_11014CDB: Call Proc_1_29_1100B834(” change to Binary :” & var_F8, var_E6)
loc_11014CF1: var_F8 = Proc_2_15_1100C840(var_F8, global_64)
If (Len(var_F8) = 0) Then
loc_11014D01: GoTo loc_11014F82
End If
loc_11014D12: Call Proc_1_29_1100B834(“Shift Left 3 :” & var_F8, var_E6)
loc_11014D22: var_368 = var_A8
loc_11014D2A: var_110 = Right(var_368, 2)
loc_11014D38: var_380 = vbNullString
loc_11014D46: Call Proc_1_27_1100E450(CStr(var_110), var_380, var_398)
loc_11014D4F: var_3A0 = “&h” & var_398
loc_11014D54: var_FA = CInt(var_3A0)
loc_11014D6D: var_368 = var_A8
loc_11014D75: var_110 = Right(var_368, 2)
loc_11014D7D: var_378 = “Right(SerialGet, 2) ”
loc_11014D85: var_120 = var_378 & var_110
loc_11014D8E: Call Proc_1_29_1100B834(CStr(var_120), var_E6)
loc_11014DA5: var_368 = var_A8
loc_11014DAD: var_110 = Right(var_368, 2)
loc_11014DB8: var_380 = vbNullString
loc_11014DC6: Call Proc_1_27_1100E450(CStr(var_110), var_380, var_398)
loc_11014DD9: Call Proc_1_29_1100B834(“Chr2Num(Right(SerialGet, 2)) ” & var_398, var_E6)
loc_11014DEC: var_120 = 56
loc_11014DFC: var_110 = CVar(var_F8 & var_F8) ‘String
loc_11014E02: var_130 = Mid$(var_110, CLng(var_FA), var_120)
loc_11014E0B: var_F8 = CStr(var_130)
loc_11014E22: var_100 = CStr(var_FA)
loc_11014E26: var_380 = “Get 64 start from digit ” & var_100
loc_11014E2D: var_398 = var_380 & ” :”
loc_11014E38: Call Proc_1_29_1100B834(var_398 & var_F8, var_E6)
loc_11014E50: var_F8 = Proc_2_11_1100DA5C(var_F8, var_FA)
loc_11014E61: Call Proc_1_29_1100B834(“Change to Hex :” & var_F8, var_E6)
loc_11014E69: var_110 = 14
loc_11014E76: var_368 = var_A8
loc_11014E7E: var_120 = Mid$(var_368, 1, var_110)
loc_11014E89: var_380 = “WDYEFAHZIJKLQMNOPGRXTSBUVC”
loc_11014E9C: var_398 = DecryptRound(CStr(var_120), 3, var_380)
loc_11014EA4: var_90 = var_398
loc_11014EB5: var_110 = 14
loc_11014EC2: var_368 = var_A8
loc_11014ECA: var_120 = Mid$(var_368, 1, var_110)
loc_11014ED2: var_390 = “Decrypt 14 digit SerialGet :”
loc_11014EDA: var_130 = var_390 & var_120
loc_11014EDE: var_3C4 = ” —> ”
loc_11014EE3: var_140 = var_130 & var_3C4
loc_11014EEA: var_3D4 = CVar(var_90) ‘String
loc_11014EED: var_150 = var_140 & var_3D4
loc_11014EF6: Call Proc_1_29_1100B834(CStr(var_150), var_E6)
loc_11014F11: var_100 = vbNullString
loc_11014F1A: Call Proc_1_25_1100F7F0(var_F8, var_100)
loc_11014F22: var_F8 = var_380
If (var_90 = var_F8) Then
loc_11014F39: var_100 = “Same result, already registered.. ”
loc_11014F3F: Call Proc_1_29_1100B834(var_100, var_E6)
loc_11014F49: var_86 = &HFF
loc_11014F4C: GoTo loc_11014F68
End If
loc_11014F55: var_100 = “different result, not register yet.. ”
loc_11014F5B: Call Proc_1_29_1100B834(var_100, var_E6, var_86)
loc_11014F65: var_86 = 0
loc_11014F68: ‘ Referenced from: 11014F4C
loc_11014F6E: var_100 = ” =============CHECK REGISTER END =============”
loc_11014F74: Call Proc_1_29_1100B834(var_100, var_E6, var_86)
loc_11014F7C: arg_4 = var_380
loc_11014F82: ‘ Referenced from: 11014D01
loc_11014F82: ‘ Referenced from: 11014966
loc_11014F82: ‘ Referenced from: 110145A4
loc_11014F84: var_86 = 0
loc_11014F8D: var_100 = ” ============= CHECK REGISTER ERROR =============”
loc_11014F93: Call Proc_1_29_1100B834(var_100, var_E6)
loc_11014F9B: arg_4 = var_86
End Function
October 4th, 2012 on 5:13 pm
Hi,i seem not to be able to find point-h on my system, i tried with vanilla olly,but the first thing i noticed is that my istruction is different than yours
MOVZX ECX,BYTE PTR DS:[EDI]
and it belongs to kernel32 instead of ntdll,even though i followed your instruction step by step,also when i restarted the target the string OpenProcessToken didnt appear,i used plain olly on xp,could it be that this works this way only on 7?
October 4th, 2012 on 5:45 pm
You still may be on the same track…The point-h on my windows xp system looks vastly different than my windows 7 point-h.
October 4th, 2012 on 6:43 pm
I believe its wrong because in the first crackme i stop at the beginning of the routine that contains the call to GetDgtItem and in the second one i get the you are wrong popup and nothing appears in the registers apart from some other strings repeated some times like “name is Your name” “serial is your serial”
October 4th, 2012 on 11:34 pm
Well apart point-h what about that ugly nag?i tried looking around but its well hidden in msvbvm50.dll
October 5th, 2012 on 3:16 pm
It is being called from the target’s code somewhere. Just keep at it.
December 2nd, 2012 on 4:10 am
R4ndom,
I could not find the P32Dasm file included in the zip for this tutorial nor on the tools page. Of course I found it easily with a simple web search but I just wanted to let you know that it is not included with the tutorial files as indicated. Thank you so much for the tutorials and I am excited and looking forward to learning more about RE!!
March 27th, 2013 on 7:23 am
Excellent series of tuts i ever seen.Thanks Random.I am using point-H finder to find my systems point-h painlessly.
May 9th, 2013 on 12:51 am
habitual piano lessonss are very bulky and expensive, whereas lectures; find a line
or individual who are uncoerced to instruct you.
July 5th, 2013 on 5:21 pm
I too had a problem with nag removal.
The nag stays there for 7000ms and there is a particular code that is looped 7 times before a jump to the callback is made. But i couldn’t trace any further.
July 21st, 2013 on 3:15 pm
Hi R4ndom… using win7 64bit with olly 1.10 can’t trap the memory bp, using olly 2.01 can’t conditional log bp since right click on names didn’t show it.
Can we do point H on win7 64bit?
August 17th, 2013 on 9:40 am
Yes u can! im using win7 64
July 22nd, 2013 on 7:03 am
In so many ways, I am more more offended by the “generic commenter” than I am
by the more obvious spammer. You may ask
why Because at least the obvious spammer is completely open and honest about their spamming!
I know who they are. The so called generic commenter is a cheat and a faker!
You can probably notice that I have strong feelings towards these
type of spammers
my homepage … be taller