There are a couple ways of injecting a splash screen into a binary. Unfortunately, none of them easy. The way I will show in this tutorial is the easiest I’ve come across, though there may be simpler options out there. The problem arises from the fact that a bitmap is a resource, and as such, goes in the resources section of a binary. Injecting resources into a compiled binary’s resource section is a recipe for a quick headache.
The method we’ll be using is to create a DLL file with the resource included in it, and then call this DLL from our target binary. Because it’s a DLL, we can load it automatically by changing very little in the binary, as we can just add it to the list of DLLs the binary requires. This also gives us the benefit of running the code in our DLL automatically instead of having to create a code cave.
In this tutorial we will be creating a DLL from scratch using assembly, so you will need an assembly language compiler. I use RadASM
(and it will be more convenient if you use this IDE as well as your code will exactly match mine), but it is not a requirement. If you are not comfortable using RadASM and want to learn, please see my series of tutorials on RadASM on the tutorials page, which comes with a full download of the RadASM suite and everything you need to run it.As with all of my tutorials, the required files for this tutorial are in the downloads, available on the tutorials
page. In addition to these files, we will be using IIDKing, available on the tools page.If you haven’t already read my previous tutorials
on modifying binaries, I highly recommend you do (at least the tutorial on injecting a message box).
Introduction
We will be inserting a splash screen in a simple program so as not to get caught up in the details. We will display the splash picture for 5 seconds, or until the user presses a mouse button. This means we will need message handlers in our DLL for mouse and timer events.
Because this splash screen is a Window’s window, we will have to register it with the operating system, and all the code that entails. This means the DLL will need a WinMain to create and display the window and a WndProc to handle the messages.
Also, as this is a DLL, we will need to create an export file (see previous modifying binaries tutorial).
Starting the DLL
First, we will create the DLL entry function. This function will be called automatically when the DLL is loaded by the target binary. To make Windows do this, we will add a section for the DLL_PROCESS_ATTACH callback. Doing this runs our entry code when the DLL attaches to the binary, in other words, when it is loaded into the binary’s memory space. Open up your assembly IDE (or Notepad as the case may be) and start a new DLL project named Splash.
Note: In RadASM, select “New Project”. Select Dll Project and enter the name “Splash”. Click Next, Next, un-check the include and bak files and check the .rc file, Next, Check Compile-rc, Finish. We now have a DLL project ready to go.
Now open the Splash.Asm file and enter the initial code (remember, a copy of all of these files is included in the download, so save yourself from typing…):
Here we simply load our imports and declare our variables.
Next comes the actual DLLEntry code:
This function simply saves the handle of the window and calls our main function, ShowBitmap. We could have entered our ShowBitmap code directly into this function, but calling it from here makes the code easier to read. It then returns true, regardless of if our code is called or not, per the Windows API instructions for DllEntry.
Next, we must make our main function to show the bitmap window:
This is the standard Windows code to set up a new window.
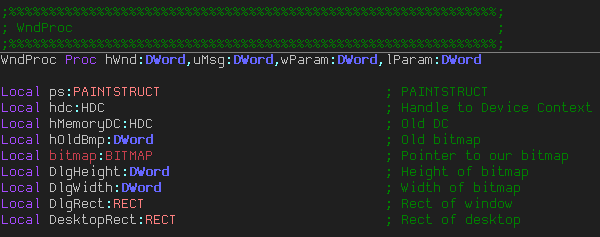
Now we start with the main displaying of our bitmap, the WndProc class. This class sets up the window, loads the bitmap and displays it, and then waits for 5 seconds or a mouse click. First, the locals:
The first message we will handle is the destroy message. Here we delete the bitmap object and close our window in the case of our window terminating:
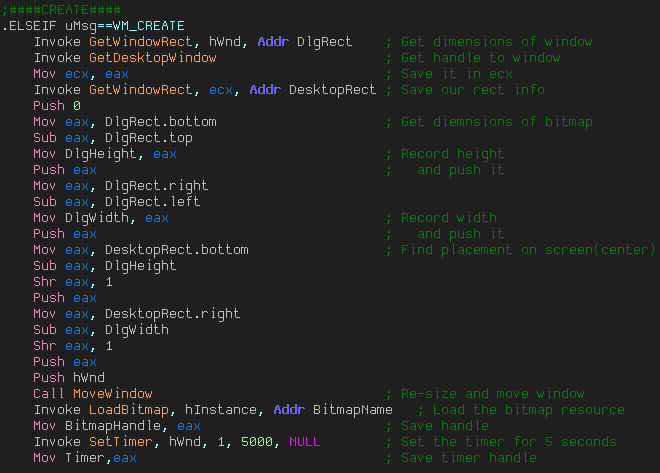
Now we actually load in our bitmap into the device context, as well as set the timer:
We then implement our timer message handler:
This simply kills our timer if the timer goes off or if a mouse is clicked.
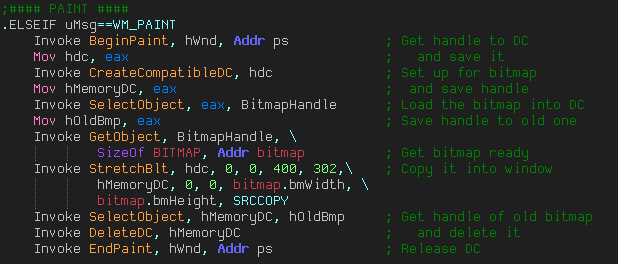
Next we display our bitmap (copying it into our window):
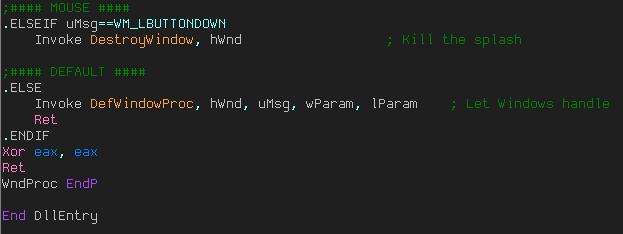
Finally, we handle the mouse click and the default messages our function won’t handle, as well as end our procedure:
That covers the DLL’s code. Now we must load our bitmap into the resource section of the DLL. In RadASM, we simply add a new resource, but if you’re not using RadASM, use whatever method is appropriate. I have included a bitmap in the download of this tutorial, but please feel free to use any bitmap you wish. We will call the bitmap MyBitmap (in RadASM click Project->Resource):
For anyone adding the resource manually, here is the Splash.rc file:
Now that the resource is loaded into the resource section we need to implement our .DEF file where we list the functions available as exports. Open the Splash.def file and enter the following:
Here we name the DLL and provide the two functions for export. Your project folder should now contain the following files:
Building the DLL
Now try building your project. If all goes well you should have additional files in your project folder:
This includes the actual “splash.dll” file named in the .DEF export file.
Note: It took me about 4 days to figure out why RadASM was giving me troubles with this project. Basically, the resource bitmap would not be compiled in to the resource file. I finally found out how to fix this, and if you are using RadASM, you must do this as well…
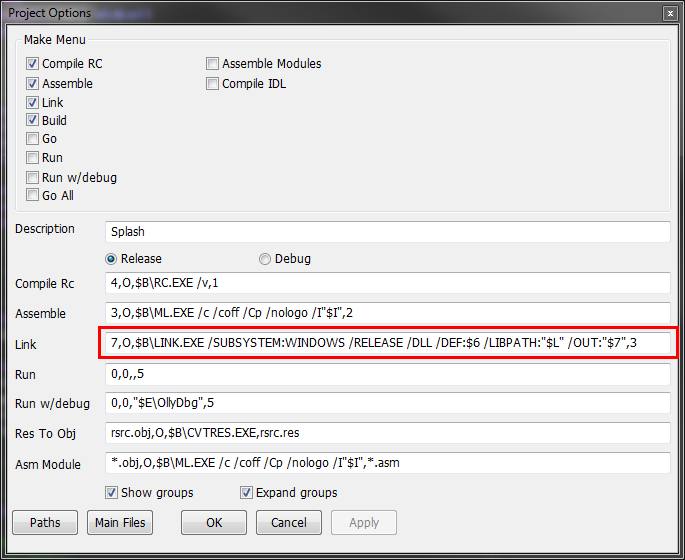
1. Select Project->Project Options. This opens the compile options for our project:
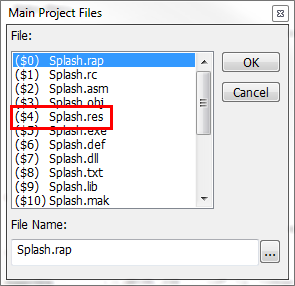
Notice the “Link” line in the red box. We must include our resource file in the compilation of this DLL. Without this, our bitmap will show as a blank window. To fix this, first click the “Main Files” button, which shows the files and shortcuts RadASM uses in the command lines:
Look for the “Splash.res” file and note the shortcut for it, denoted with a dollar sign. In my example, it is “$4″. Now close this window and add the following in to the link field:
replacing the $4 with whatever shortcut your .res file was. You can also copy the following line and paste it into your link field, replacing the $4 with your appropriate shortcut:
7,O,$B\LINK.EXE /SUBSYSTEM:WINDOWS /RELEASE /DLL /DEF:$6 /LIBPATH:”$L” “$4″ /OUT:”$7″,3
Now, when you compile your DLL, the bitmap should be included. Go ahead and build it now.
AND PLEASE: if anyone knows the reason for this, please email me or post it on the site.
If you recall from the last tutorial on injecting a message box, we can test the DLL at this point to make sure it works. To do this we will use the rundll32 program provided by Windows. Open a command prompt and enter the following:
When you execute this command, you should see the DLL splash pop up for 5 seconds and then go away. The image will then pop up for an additional 5 seconds and then the dll will end. The reason for it showing twice is that, when using rundll32.exe, the DLL is called both when it is loaded and again when it is released.
Injecting the DLL
Now that we have a compiled DLL containing our bitmap, it is time to inject it. We could do this by hand, but there really is no need. We can simply use IIDKing to inject it. Go ahead and run IIDKing:
Now we need to pick a file to inject. I chose a simple freeware color picker (included in the download of this tutorial), but you can use any 32-bit program. Copy the splash.dll file we made into the same directory as your target (colorpicker.exe). Now click on “Pick a file” and select your target:
I usually keep the backup option selected so I don’t mess anything up (which is pretty easy to do when messing with binaries like this!) Now click the “Click to pick DLL(s)…” button and select the splash.dll file from the same directory as your target. When you do, the name will appear in the Name field and IIDKing will ask which functions you wish to import:
I will select both of them (even though really we only need to import the ShowBitmap function), then select “Add them!”:
Now we can see that we are including both functions from the splash.dll file. Now go ahead and click “Add them!” on the main screen and if all goes well you should see a success message:
As soon as you click OK, the new version of your target will be saved, a backup will be saved with a .bak extension, and a file will be created with an exe.txt extension letting us know exactly what IIDKing did. Go ahead and open this file:
This information will be very helpful in future tutorials as it tells us exactly which address we must call to access our functions. Because we call our functions automatically when the DLL is loaded, we don’t have to worry about it in this tutorial. But for the future, if you open our target in Olly you can see what has been added:
Here, we can see that our functions have been added to the IAT (you must analyze this section to show it properly- I used AnalyzeThis!). So these functions are now available to our target. Now go ahead and run the target (in or out of Olly) and you will see our splash displayed:
You can either wait five seconds (which you’ll probably want to do to see the bitmap in all its glory) or click on the splash to then run our target. We have now successfully injected a splash screen into a binary!!!
-Till next time
R4ndom








October 14th, 2012 on 9:24 pm
What is the purpose of injecting a bmp splash screen. Is their something nor sinister to leverage with this hack?
October 14th, 2012 on 10:39 pm
Pranks on co-workers, of course.
November 25th, 2012 on 4:56 am
How can we use picture other than .bmp