Introduction
As an extension of my last modifying binaries tutorial on making programs non-closeable, I decided to take it one step further. In this tutorial I will teach you how to trap when someone tries to close the program and allow us to perform whatever code we want when this happens. This can come in handy if, for example, you want to drive someone to be the best they can be by placing helpful message boxes for them every time they try to close their word processor, such as “You don’t really think that paper is any good, do you? Try again” and “I’m not letting you close this app until you have really put some effort into this paper.”
In this tutorial the only tools you will need are OllyDBG (either the original version or my version on the tools
page) and a copy of the target, which can be downloaded with this tutorial on the tutorials page.
Investigating the App
The app I chose for this is one of the examples used in Petzold’s “Programming Windows” book- one of the best books on programming windows there is (though it is a little dated). In it there is an example program called “HexCalc” that is a poor man’s version of Windows Calc. Running the program, you can see what I mean:
As you can see, it’s just a basic calculator for calculating in hex. Loading the app in Olly:
For some reason Olly has decided to not analyze automatically. We can tell because the method calls and arguments are not highlighted. If you have AnalyzeThis plugin, run that (you can download on the tools
page). Otherwise right-click in disassembly window and choose “Analyze” -> “Analyze code” and Olly will clean it up a little:That looks better. In this tutorial we will be switching back and forth between a lot of different address, so I will use the bookmarks plugin to keep them straight. This plugin can also be downloaded on the tools
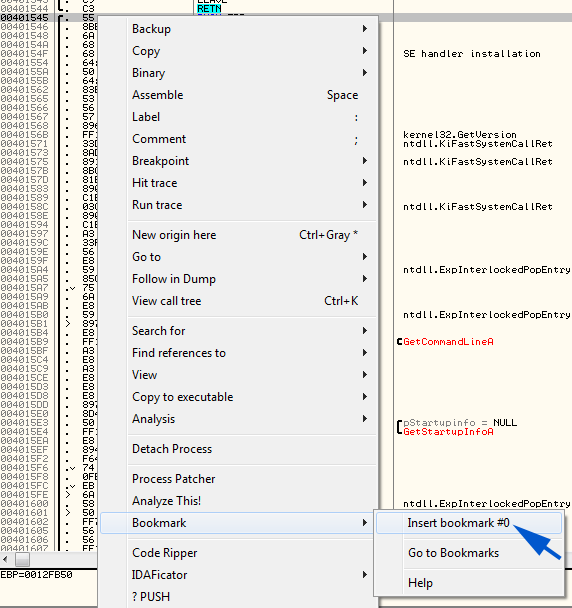
page. The first bookmark I will place is on the entry point as it is not at the start of the program:and I will call it “Entry Point”:
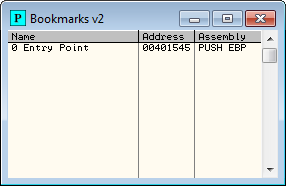
Then, opening the bookmarks window I can see my bookmark (Plugins->Bookmarks->Bookmarks):
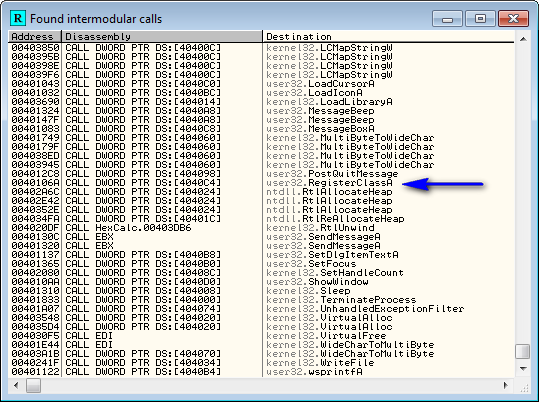
Now, our ultimate goal is to find the WndProc or DlgProc callback functions so that we can trap the Windows message that tells the window to close and put our own code in it. If you haven’t, please look over my modifying binaries tutorial “Making an App Non-Closeable” as it goes over finding these callback procedures. Assuming you read that over (or have a basic understanding of how Windows creates windows and dialog boxes) we can open the intermodular calls window (right-click -> Search for -> All intermodular calls) and see whether this program uses a typical window or a dialog box as it’s main screen:
We first look for RegisterClassA or RegisterClassExA, and if it’s there, as it is in this case, we can assume that this app uses a window for its main screen as opposed to a dialog box.
*** If there was no RegisterClassA then we would look for DialogBoxParamA and go that way instead. ***
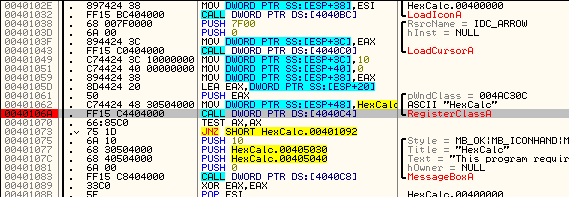
Double-clicking on RegisterClassA we come to the main call:
I have put a BP on the call just to highlight it. Now, you will recall from my other tutorial that when a window is registered, the address for the message handler callback will be pushed onto the stack as one of the arguments. To find this we go up a line or two and look for the ubiquitous PUSH EAX:
We then look at the value of EAX by highlighting that line and looking in the info window:
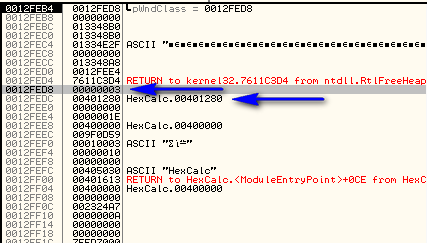
Here we can see that EAX is 12FED8. Looking over in the stack window under 12FED8 we see the number 3 pushed, and under that is the callback address for the message handler:
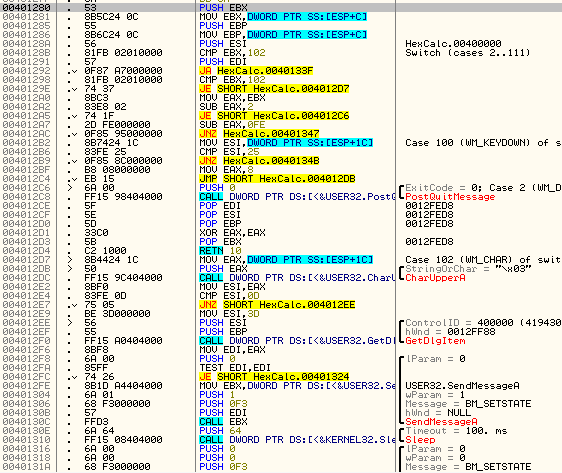
So the main message handler is located at address 401280. Let’s go to that code:
Seeing the Switch (cases 2…111) is a dead giveaway that this is the message handler. I will go ahead and set a bookmark here as well called “Message Handler”.
As a refresher, Windows will send every message through this callback, and our program can either decide to act on it or send it on to Windows for Windows to handle it. The message we need to trap is the WM_CLOSE message, or 0×10. You can look up all Windows messages and their hex values by downloading my cheat sheet on the tools
page under texts.Let’s run the app and see this for ourselves. Remove any breakpoints and run the app in Olly. The main HexCalc window will show up. Make sure that Olly (or any other window) is not covering up the HexCalc screen or you won’t be able to send the proper messages in to Olly. Now place a BP at address 401292 as this is our first conditional jump:
Olly will now pause when any messages from Windows comes through our handler. (You will notice that if you move the mouse over the HexCalc window Olly will pause. This is because a mouse event has been passed into the handler. If this happens, just F9 until Olly is running again.)
Now, what we want to do is hover our mouse just outside the ‘X’ close button in the top right corner of HexCalc (but not touching the HexCalc window) and then quickly click the ‘X’ button. The reason for this is we want to minimize the number of messages that flow through the handler. Otherwise we’ll be going through an awful lot until Windows passes the WM_CLOSE message.
You won’t see the window close as Olly will pause immediately when the first message comes through which will probably be a mouse event. So switch over to Olly and let’s see the messages come through and what happens when they do:
Looking at the compares we can see that the windows message ID will be in EBX (this will not always be the case). We can see that EBX contains 0×20:
Looking up hex 20 in our cheat sheet we can see that this is the windows message for WM_SETCURSOR. Single stepping the code we see that this message is eventually given to DefWindowProcA. This is the function to allow Windows to handle the message instead of our program handling the message. We can also see that this is the default of the switch/case statement. This is important because the message we want, WM_CLOSE, will also be passed back to Windows to handle.
Go ahead and hit F9 to see the next message come through:
and we can see that it also has an ID of 20. Now, you will F9 several times until we get to the ID we want, 0×10. If you want, you can look up the various messages that come through in our cheat sheet. They will be such things as WM_SETFOCUS, WM_MOUSEBUTTONDOWN etc. Keep pressing F9 until EBX contains 0×10:
These are the message IDs I went through to get to 0×10 (yours may be different): A0, 2A2, 21, 46, 1C, 86, 06, 281, 282, 07, 215, AE, 112.
OK, our WM_CLOSE message has come through. Now let’s single step and see what it does. First, it hits the jump at address 4012AC and will jump.
If you watched the other messages come through here, you will have noticed that most (if not all) messages jumped on this JNZ. This JNZ points to the default case of the switch/case statement, basically the call to DefWindowProcA that tells Windows to handle this message for us. I am going to go ahead and put a bookmark at address 4012AC called “Jump to Code Cave”:
After I place a bookmark at address 401347 called “Normal Message Return”, I now hit F9 a couple more times and you will see the cleanup messages come through. These include 90, 46, 47, 281, 282, 2, 82. The window will actually close when the 02 message comes through. This is the message for WM_DESTROY. The app will then terminate.
Starting the Patch
Now let’s think about this. We know we need to trap the WM_CLOSE
message with an ID of 0×10, but we need to let all of the other messages
come through, or else the app will not respond to anything. What we’re
going to have to do is add a compare in here somewhere that checks if
EBX is equal to 0×10, and if it is we perform our own code. If it isn’t,
we just pass the message on like normal. This can be accomplished by
both a code cave or injected DLL, but in this case, as there is plenty
of extra bytes, we will use a code cave. I think in the next tutorial we
will do this same thing but use a DLL instead, that way we can compare
the two ![]() .
.
So in effect, we need to make the JNZ instruction at address 4012AC jump to our own code. In our code we will first compare EBX with 0×10. If it is not 0×10, we will jump to the place the JNZ would have originally jumped, letting the message follow the normal flow it would have. If it is equal to 0×10, we will send it to our own processing, where we can do whatever we want.
First we need to talk about ….
Creating A Code Cave
This app is pretty easy to find a suitable code cave; just scroll down toward the end of the section till we see a bunch of zeroes:
So our code cave can start at address 403DBC. I will place a bookmark at the first zero at address 403DBC. My bookmarks window now looks like this:
This will help when I start jumping around ![]() . Let’s go ahead and start coding our cave. The first thing I want to do is copy EAX to ECX so I can modify it:
. Let’s go ahead and start coding our cave. The first thing I want to do is copy EAX to ECX so I can modify it:
MOV ECX, EAX
I then want to clear everything but the lowest byte so that I can make ECX equal to the message ID only:
AND ECX, 0FF
When typing the’FF’ I must put the zero in front of it as Olly doesn’t like when you enter hex values that start with a letter without the initial zero. What this statement does is clears everything in ECX except the lowest byte to zero. So if EAX was FFFFEF10, meaning that AX held the ID of the WM_CLOSE message, ECX would equal FFFFFF10, and after the AND statement ECX would equal 00000010. Now I want to compare this ID with 0×10:
CMP ECX, 10
and if it’s not 10, we just want to jump where we would have initially jumped. Looking up at address 4012AC, we can see that we would have jumped to 401347. This is the beginning of the DefWindowProcA procedure. So add this jump:
JNZ 401347
So now every message that is not WM_CLOSE will go through normally, while the WM_CLOSE message will fall through into whatever we do next. Let’s not do anything crazy yet, just to see if our code works. We’ll just put a jump to the end of the DefWindowProcA routine to make sure our cave works. This will basically make the close button do nothing if we click the ‘X’ in the title bar. The address we want to jump to is 401359. This jumps to right after the call to DefWindowProcA. Here’s what our cave should look like after entering the instructions:
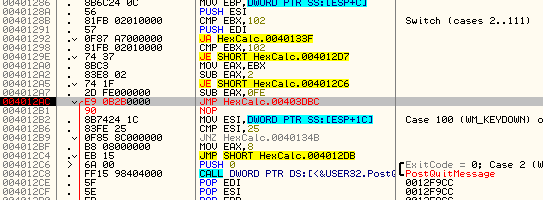
And we need to go up and change the JNZ to automatically jump to our code cave at address 4012AC. Just double-click on the bookmark “Jump to Code Cave” and we should land here:
Patching this jump to always jump to our code cave:
Gives us our new patch:
which jumps to our code cave:
Trying Out The First Patch
Let’s go ahead and try it. First, place a BP on our patched jump to the code cave at address 4012AC and run the app. If you need to re-start the app first make sure you re-activate the patches:
and we can see that EBX contains the first message, in this case it is 0×24, or WM_GETMINMAXINFO. Let’s single step past the jump and we arrive at the first instruction of our code cave:
Single step a couple more times and you will notice that, since this message is not 0×10, we will simply jump back to where we originally would have jumped to, namely the DefWindowProcA procedure. Now let’s test the close message. Remove the BP and run the app. Now place the BP back on at address 4012AC and do like you did before, quickly click the close button in the HexCalc app. Olly will break as usual:
Now, we must hit F9 several times, watching the EBX register. When EBX equals 0×10, we then single step into our code cave. When we get to address x we can see that we are not taking the jump and instead falling through to the next line:
Instead, we will jump back, but this time it will be after the call to DefWindoProcA:
Now remove the BP at 4012AC and hit F9 and see what happens…Nothing! The window did not close. Go ahead and try and close the window- it won’t close. So our patch and cave work. Before we do anything else, let’s save the changes. Right-click and choose “Copy to executable”. Select All modifications. Right-click in this new window and select “Save file”. I saved it as HexCalc2.exe. Now load this new file into Olly and we can do the second part of the patch.
Patching the Second Part
Now we want to do the fun stuff. Let’s make it so that every time the user clicks the close button, we display a different message in a message box. After a certain amount of messages, we will finally let the app finish. Here we can see our new code cave in Olly (after it has been saved to another file and re-opened):
In order to accomplish this, what we will do is designate one of these addresses as a counter. Because this memory is set to zero by default, we do not need to worry about setting it the first time through; it will start as zero. We will create a set of if/then statements, comparing this memory location’s contents with a number, and depending on the number, that will be the message we display. Then, we will increment this counter so that the next time through it will select the next message. If the counter reaches a certain number, we will then simply call the correct address, the DefWindowProcA, allowing the app to close. This is not the most efficient way of doing this, but it is easily explainiable. So here is what the code will basically look like:
PUSH the style for Message box
PUSH the address of the title of the message box
if( counter == 0 )
PUSH address of first message’s text
elseif (counter == 1 )
PUSH the address of the 2nd message’s text
elseif (counter == 2 )
PUSH the address of the 3rd message’s text
…
else
jump to DefWindowProcA (fixing the stack before we jump) as we want to close the app now
PUSH the handle to the message box (null)
call MessageBoxA
increment counter
jump to after the DefWindowProcA call to continue so the app doesn’t close
What this does is first pushes two of the four arguments onto the stack that we will need, the style and the title (you can use the MessageBoxA call at address 401083 for reference on the arguments and the address of the call). It then goes through selecting a message to display based on the value of our counter. If we have reached the end, meaning we’re not going to show any more messages and just quit instead, we need to remove those two argument we pushed to make the stack correct and then we jump out of this section of code. If instead one of the messages is displayed, we push the address of the text for this message (the third argument) and finally push the fourth argument, the handle to the window, which in this case we will just make null as it does not have to have a parent. Lastly, we call MessageBoxA, increment our counter for next time through, and jump back to the main code.
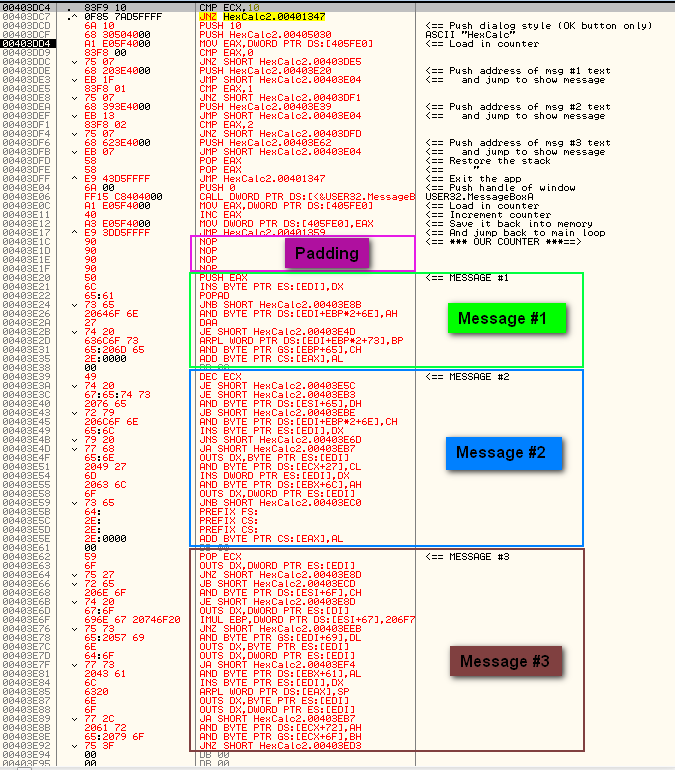
Here is the code assembled into the code cave (but before it is saved):
There are a couple things to note here. The first is that the messages don’t look anything like text. That’s because Olly does not know that they are ASCII strings yet. I simply highlighted a bunch of this memory, chose “Binary”->”edit” and started typing in the ASCII section. When you run the app and it pushes the address onto the stack, you will see the ASCII text representation, but until then, it will look like gibberish. Also, after you save it and reload it, you will see that it looks correct then because Olly will know that they are text.
Second, I added some padding between the main program and the text messages- this is just in case I screw up I can add an instruction later. I just put them in as NOPs starting at address 403E1C. I always do this (if there’s room).
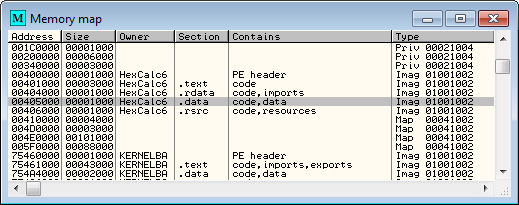
Third, you may wonder where I got the address for the counter (405FE0) and why I didn’t just use an address in the code cave. The reason is the code cave is part of the code and it’s attributes are set as executable, not writable. Therefore, I had to find a section of the binary that had writable access. Opening the memory modules window we can see where the other global variables are kept (almost always in the ,data section):
and we can see that data is stored starting at location 405000. I then scrolled down to the end of this section and just chose a blank location, 405FE0 in this case.
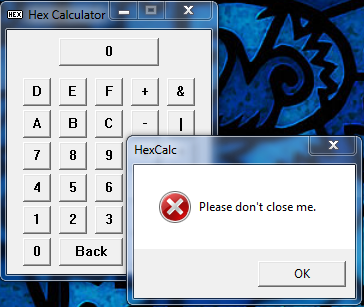
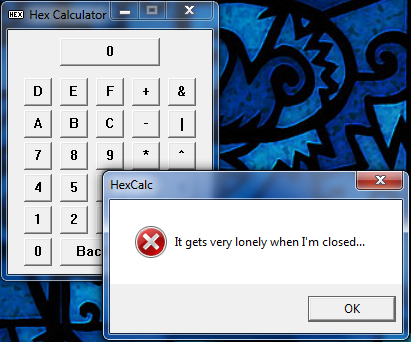
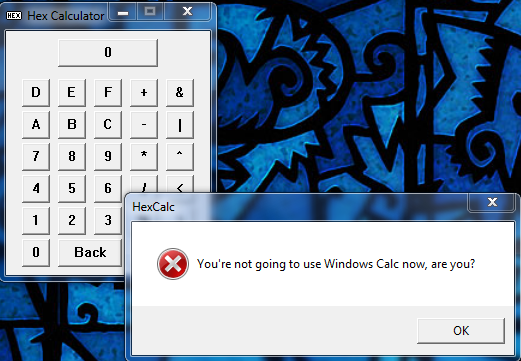
Now when we run the app, our counter at address 405FE0 will be zero, so we will display message #0. We will then increment this counter and return back to the main loop. Each time through, the counter will be one more so we will show the next message. When the counter reaches 3, we will instead pop the two arguments we pushed onto the stack and return to let windows end the app. Here’s what the message boxes look like each time you press the close button:
and on the last close the app will actually close. Of course, if
you’re evil, you could simply reset the counter after 3 and show the
same messages over and over again. The only way to shut the app would be
to open the task manager and kill the process ![]() . Or you could put in a lot more messages and have a random message
shown only once every time the user quits. Really, the sky’s the limit.
. Or you could put in a lot more messages and have a random message
shown only once every time the user quits. Really, the sky’s the limit.
-Now go have some fun.
R4ndom









August 2nd, 2012 on 4:45 pm
Hi R4ndom,
this is a great article,
this make me feel like finishing a little tool that let you to append a section on a PE file and even adding some additional null-bytes. Would you be interested in?
Cheers.
August 2nd, 2012 on 7:44 pm
YES!!!!!!
I was thinking of doing the same thing but I just don’t have the time. I would also post an article on it on the blog and make it available for download.
Please let me know.
R4ndom
August 2nd, 2012 on 10:32 pm
Hello again R4ndom,
you can find the whole progress of that stuff in there: http://ge0-it.blogspot.co.uk/
I added your blog on my list. Do you have any twitter account?
Cheers!
August 3rd, 2012 on 9:15 am
Hola,
what kinda bookmark plugin version is that. I cannot name the bookmarks with my version.
Thanks.
August 3rd, 2012 on 10:34 am
Never mind – got it.
August 3rd, 2012 on 4:39 pm
V2
August 4th, 2012 on 11:33 pm
Yop R4ndom,
Please check http://ge0-it.blogspot.co.uk/2012/08/adding-section-to-your-pe-easy-way.html
it might help you…Cheers